Blog Category (Part II) with Micro-Layout and Language Overrides
It is always a challenge to give a Blog category view a unique and attractive look.
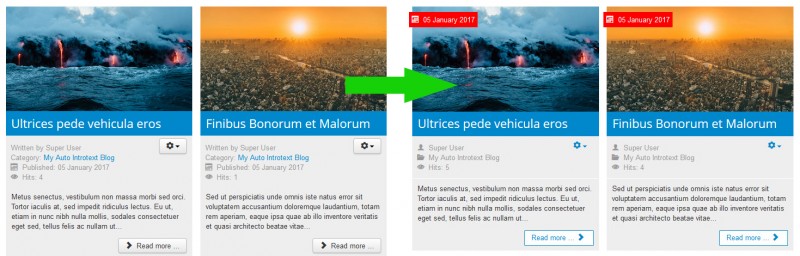
Blog items, except for the introtext we tried to control in the previous (Feb) issue, consists of various other elements like image, author name, category name, date etc.
By changing them we can achieve a new look, as despite their individual size they are affecting a lot the appearance of a blog page.
So here we’ll show how can use the (so-called) micro-layouts overrides for some of these elements, in conjunction with language overrides, to make these fine retouches.
Also, we will improve(*) my previous issue tutorial in two steps.
How we will do it?
We will use the Joomla standard template “Protostar” to create micro-layout and language constant overrides for the elements: author name, category name, published date and read more.
Then we will make two changes in our first tutorial in order to be 100% overridable.
(Blog improving (step C) is optional. The blog works very well as it is, but as ”better is the enemy of good” you can do these changes to retain the parameter input in backend after an update.)
The steps that we will follow are:
- Micro-Layout and Language Constant Overrides
- CSS changes
- Improving the blog with auto created introtext (optional)
A. Micro-Layout and Language Constant Overrides
1. Author name:
We will add an icon with a Layout Override and remove the “Written by” text with a Language override.
a. Copy the file:
../layouts/joomla/content/info_block/author.php
to:
..templates/protostar/html/layouts/joomla/content/info_block/author.php
Open the file and at the end of line #13 after the closing tag add:
<span class="icon-user"></span>
b. In the backend, Extensions > Languages > Overrides we will select “New” and in the “Language Constant *” field we will enter the constant “COM_CONTENT_WRITTEN_BY”. Below in “Text” field enter “%s”.
2. Category name:
As above we will add an icon with a Layout Override and also remove the “Category” text with a Language override.
a. Copy the file ../layouts/joomla/content/info_block/category.php
To
..templates/protostar/html//layouts/joomla/content/info_block/category.php
Open file and at the end of line #13 after the closing tag add:
<span class="icon-folder-open"></span>
b. As in previous step override the language constant “COM_CONTENT_CATEGORY” to “%s”
3. Published date:
Here we will override only the Language constant and then place the date at the top left of image with css (just for fun).
a. As in previous steps override the Language Constant “COM_CONTENT_PUBLISHED_DATE_ON” to “%s”
b. See code in the “CSS changes” step below.
4. Read more:
We will change the button icon from left to right with a Layout Override
a. Copy the file ../layouts/joomla/content/readmore.php
To
..templates/protostar/html//layouts/joomla/content/readmore.php
b. Open file, cut the line #18:
<span class="icon-chevron-right"></span>
And past it at line around line #32 before the closing </a>
B. CSS changes
Enter the following code to the file ../templates/protostar/css/user.css that we created in part 1 of the tutorial.
/*move published date over top left of image */.blog.myAutoBlog .published { position: absolute; top: 10px; background: #ff0000; color: #fff; padding: 5px; left: -15px;
}/* beautify of elements */.blog.myAutoBlog .btn { background-color: #fff; border: 1px solid #0088CC; background-image: none; box-shadow: none; border-radius: 0px; text-shadow: none; color: #0088CC;}
.blog.myAutoBlog .icons .btn { background-color: transparent; border: 0px;}.blog.myAutoBlog .icons .caret { border-top: 4px solid #0088CC;}.blog.myAutoBlog .article-info.muted a{ color:#999;}.blog.myAutoBlog .article-info.muted { border-bottom: 1px solid #fff; padding: 0 0 10px; margin-bottom: 10px;}
C. Improving the blog with auto created introtext (optional)
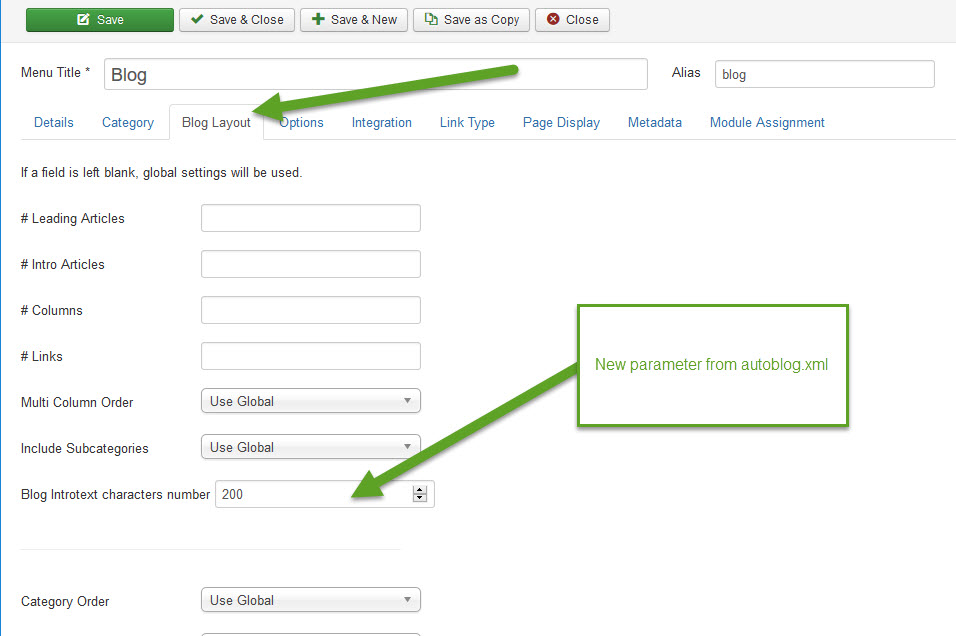
The idea of the next 2 changes is the field that controls the number of the characters to be moved from the Template parameters to “Menus: Edit Item” so it will be more easy to change it through menu item parameters in backend and it will be in Menus: Edit Item > Blog Layout.
The second and more important reason is that in the next update, autoblog.xml will not be overwritten like templateDetails.xml, so we will have a 100% overridable installation.
We will make changes in the files we have created in the previous post, autoblog_item.php and autoblog.xml
1. Changes in autoblog.xml:
We will open the templateDetails.xml, and cut this part of code we entered in previous tutorial:
<field name="charactersNumber" label="Blog Introtext characters number" description="Enter the max characters number that will be used from main text to introtext" type="number" default="200" />
Now we will paste it inside autoblog.xml after the line #222 (after field “field name = "show_subcategory_content" )
2. Changes in autoblog_item.php
In order to make the parameter of the previous field to work, we must change the line that creates the introtext, by calling it not from template but from autoblog.xml:
Existing code:
<?php echo JHtml::_('string.truncate', strip_tags($this->item->introtext), $template->params->get('charactersNumber', 200));?>
New code:
<?php echo JHtml::_('string.truncate', strip_tags($this->item->introtext), $params->get('charactersNumber', 200));?>
See now the parameter in Menus:Edit Item, Bog Layout tab:
Conclusion:
We located the files for some of those elements we see in blog items, overridden them and also made some languages constants overrides in order to change them to our needs.
As always we used the flexible Joomla overrides, and in this particular tutorial, Micro-Layout, and Languages Constant Overrides, to keep changes safe on next updates.
Of course, some of the above changes can be achieved using just CSS, but I made them through overrides to show the procedure, so you can later do more extensive changes.
Also, we made two changes in our 1st tutorial in order to be 100% overridable.
Sources:
Article images in example pages screenshots are from the unsplash.com
Joomla! Documentation - docs.joomla.org
(*) Thanks @pepperstreet for his comment in 1st tutorial, where I based the blog improvement.
About the author
By accepting you will be accessing a service provided by a third-party external to https://magazine.joomla.org/
Comments