End-to-end testing with Joomla! and Cypress - My First Steps and thoughts
Automated tests are not a special tool for software developers in large projects. Especially for extensions, automated tests are a help to quickly identify problems. They help to ensure that extensions work smoothly in newer Joomla versions.
The Joomla Core developers want third-party software developers to test their extensions, to find bugs before a user finds them. This requires a lot of time and is boring work. Therefore it is often not done. Especially not if it has to be done manually by humans for each new release. Automated testing makes it possible to repeat the manual steps for each release without a human performing the steps themselves. This way, bugs are found before a user encounters them when accessing the live system.
By the way, anyone who wants to check out Cypress will find this text a good place to start. You can test problems without having to install and configure everything yourself. In the Github repository of the Joomla project everything is ready to go.
Intro
"While it is true that quality cannot be tested in, it is equally evident that without testing it is impossible to develop anything of quality." – [James A. Whittaker]
Before I first came across Cypress, I couldn't have imagined that the barriers that often got in the way of my testing would actually be moved aside somewhat. I spent a lot of time testing software - and earlier even more time dealing with the problems that arose due to a lack of testing! Now I am convinced that tests that are:
- as close as possible in time to the programming,
- automatically,
- frequently - ideally after each program change,
bring in more than they cost. And what's more: testing can even be fun.
It is worth to learn test methods! Test methods are long-lasting, because they can be used not only with any programming language, they can be applied to almost any human work. You should test almost everything important in life once in a while. Test methods are independent of specific software tools. Unlike programming techniques or programming languages, which are often in and out of fashion, the knowledge of how to set up good tests is timeless.
Who should read this text?
Anyone who thinks that software testing is a waste of time should take a look at this article. In particular, I would like to invite those developers to read this who have always wanted to write tests for their software - but have never done for a variety of reasons. Cypress could be a way to remove such barriers.
Some theory
The Magic Triangle
The Magic Triangle describes the relationship between the costs, the required time and the achievable quality. Originally, this relationship was recognized and described in project management. However, you have probably heard of this tension in other areas as well. It is an important issue in almost all operational processes in a company.
For example, it is generally assumed that a higher cost has a positive impact on quality and/or completion date -that is, time.
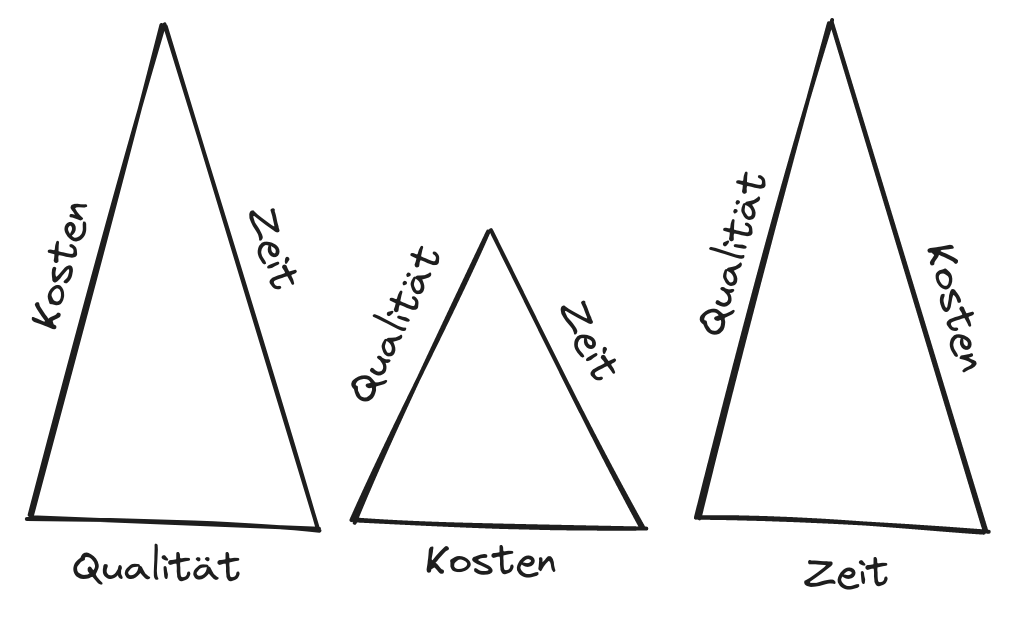
The other way around, a cost savings will force quality to decrease and/or completion to be delayed.

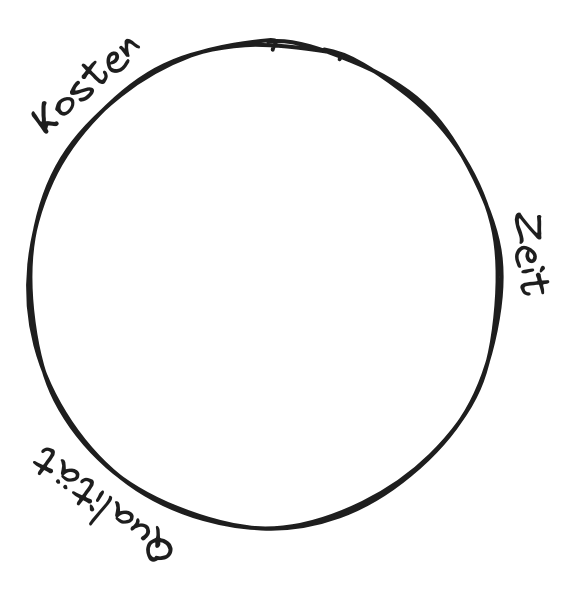
Now the magic comes into play: We overcome the correlation between time, costs and quality! Because, in the long run, this can actually be overcome.
The connection between time, costs and quality can be overcome in the long run.
Perhaps you too have experienced in practice that a reduction in quality does not result in cost savings in the long term. The technical debt that this creates often even leads to cost increases and additional time.
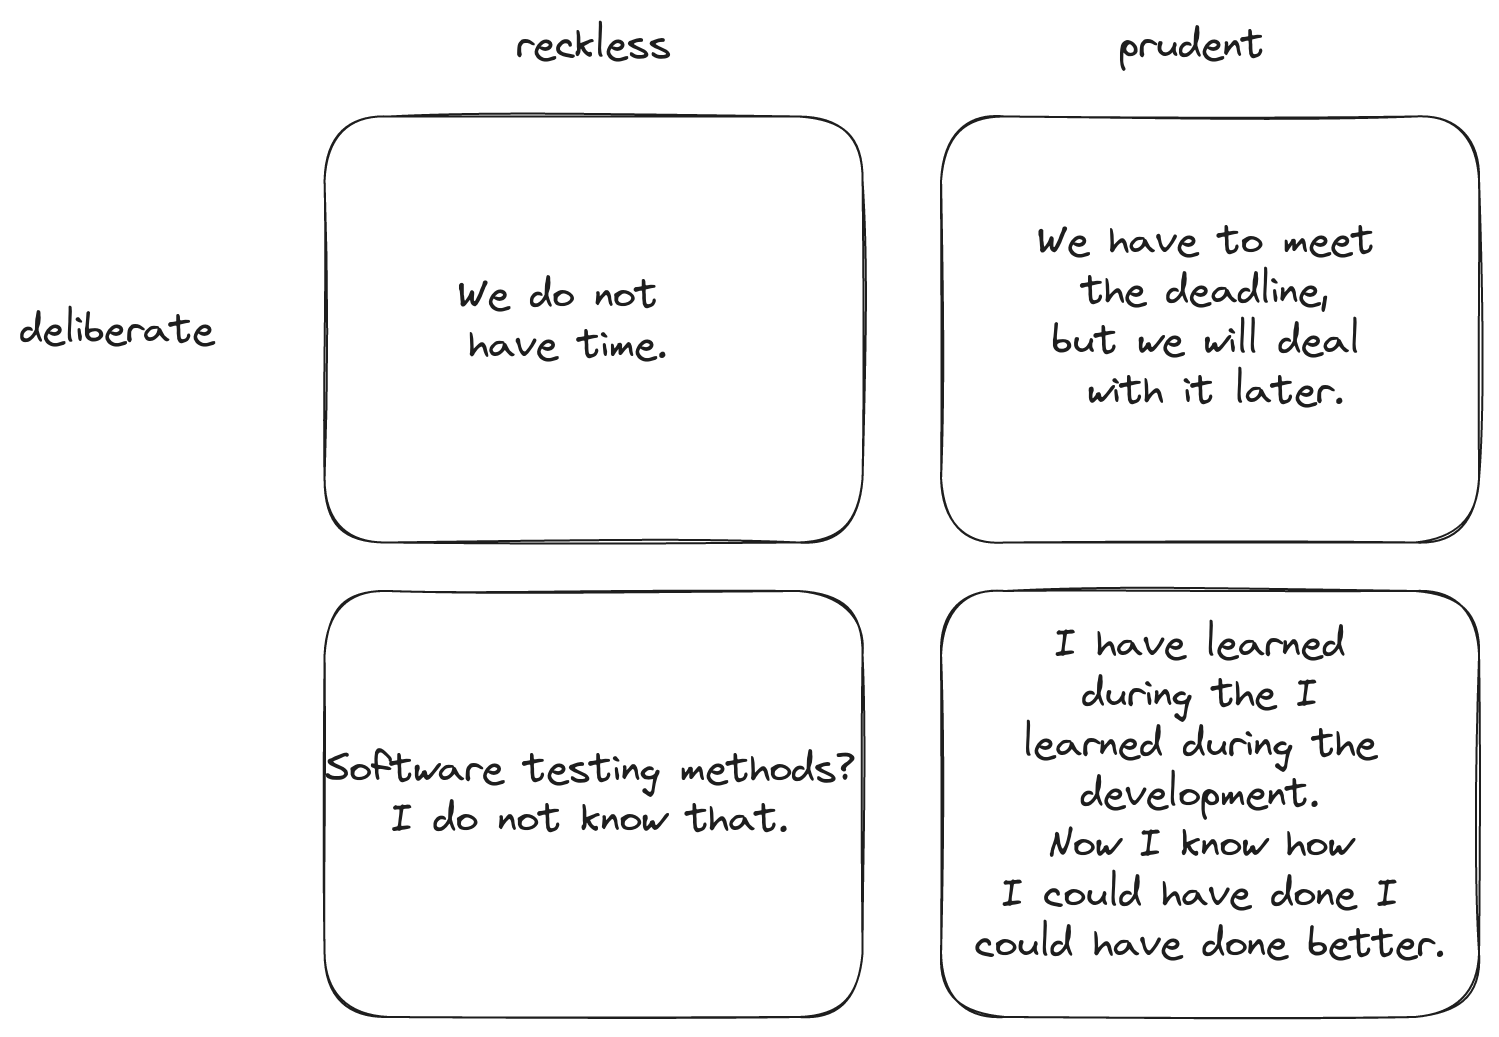
Technical debt refers to the extra effort involved in making changes and enhancements to not good programmed software compared to well-written software. Martin Fowler distinguishes the following types of technical debt: Those that one has entered into deliberately and those that one has entered into inadvertently. He also distinguishes between prudent and reckless technical debts.
Costs and benefits
In the literature you will find devastating statistics about the chances of success of software projects. Little has changed in the negative picture that was already recorded in a study by A.W. Feyhl in the 1990s. Here, in an analysis of 162 projects in 50 organizations, the cost deviation compared to the original planning was determined: 70% of the projects showed a cost deviation of at least 50%! Something is not correct! You can't just accept that, can you?
One solution would be to dispense with cost estimates altogether and to follow the argumentation of the #NoEstimates movement. This movement is of the opinion that cost estimates in a software project are nonsensical. A software project contains according to opinion of #NoEstimates always the production of something new. The new is not comparable with already existing experiences and thus not predictable.
The more experience I get, the more I come to the conclusion that extreme views are not good. The solution is almost always in the middle. Avoid extremes in software projects as well and look for a middle. I am of the opinion that you don't have to have a 100% sure plan. But you should also not start a new project naively. Although software project management and especially cost estimation is an important topic, I will not bore you with it any longer in this text. The focus of this article is to show how E2E testing can be integrated into the practical workflow of software development.
Integrate software testing into your workflow
You have decided to test your software. Great! When is the best time to do this? Let's take a look at the cost of fixing a bug in the different project phases. The earlier you find a bug, the lower the cost of fixing it.
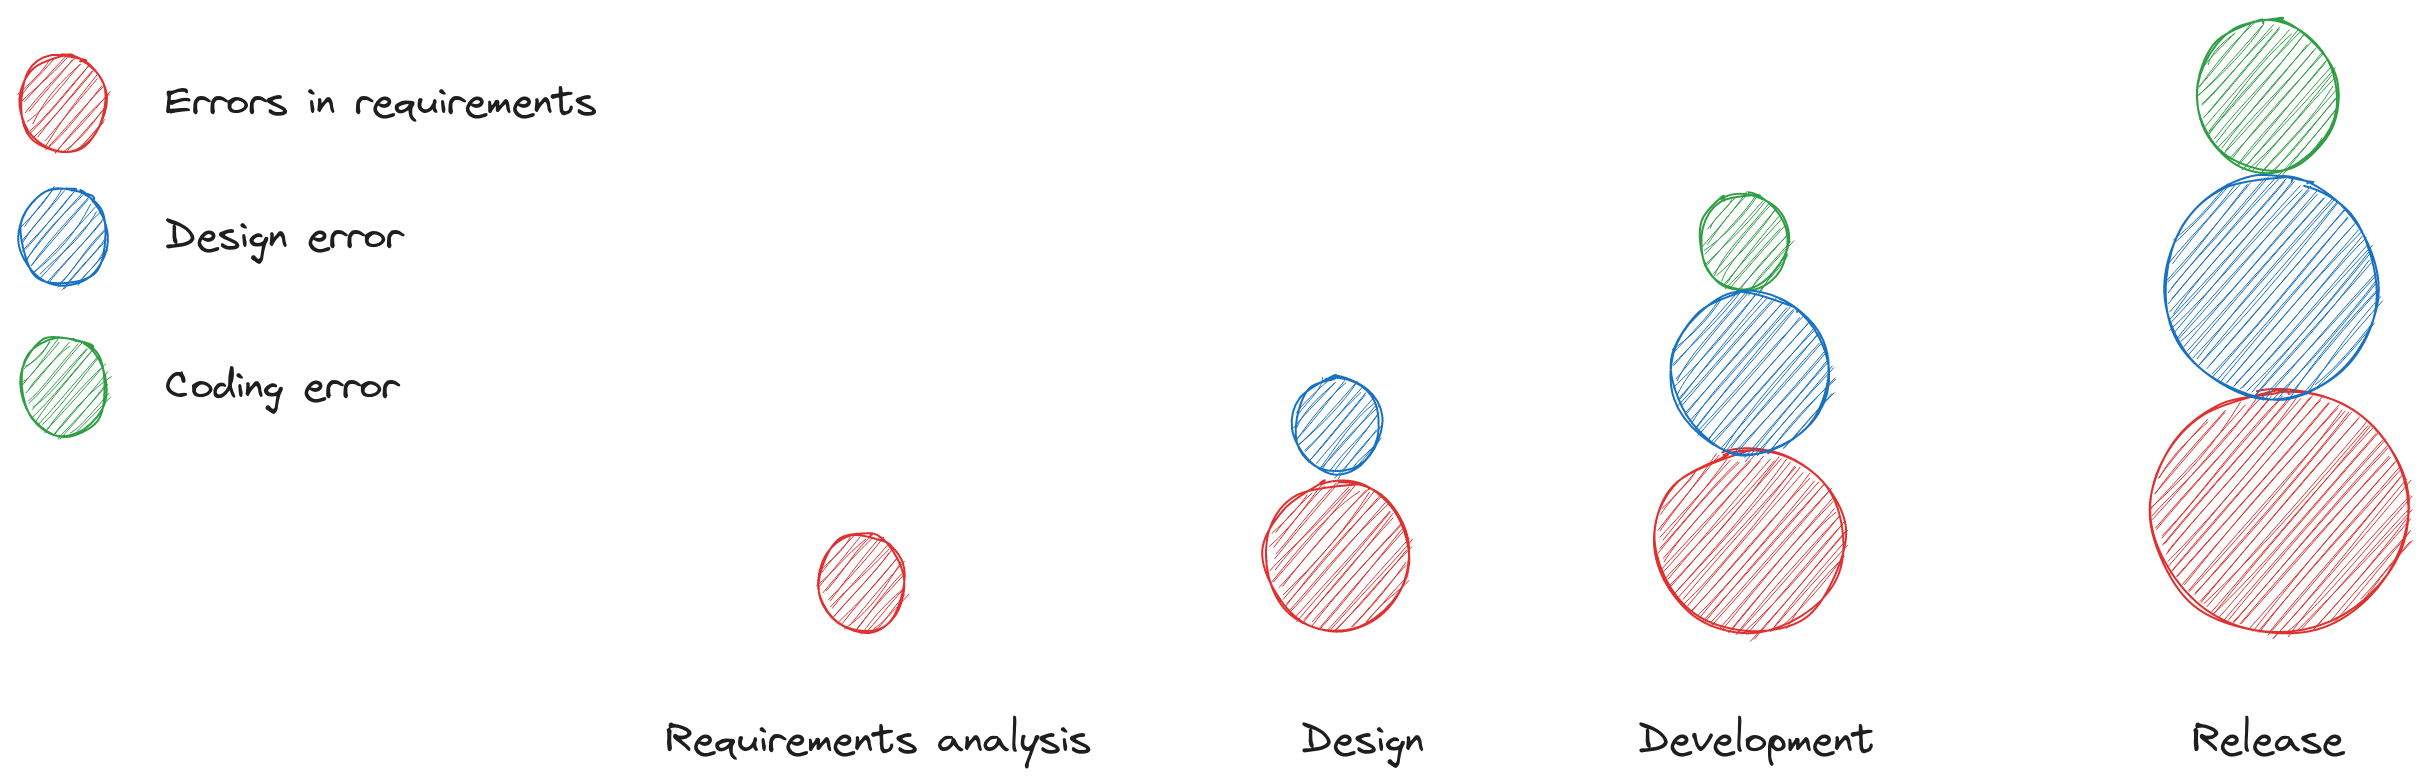
Testing and Debugging: There are words that are often mentioned in the same breath and whose meanings are therefore are equated. On closer inspection, however, the terms stand for different interpretations. Testing and debugging belong to these words. The two terms have in common that they detect malfunctions. But there are also differences in the meaning.
- Tests find unknown malfunctions during development. Finding the malfunction is and expensive, while the localization and elimination of the error is cheap. on the other hand cheap.
- Debuggers fix malfunctions that are found after the product is finished. Finding the malfunction is free of charge, but locating and fixing the error is expensive.
Conclusion: It makes the most sense to start integrating tests as early as possible. Unfortunately, this is difficult to implement in an open source project like Joomla with mostly voluntary contributors.
Continuous Integration (CI)
Continuous integration of tests
Imagine the following scenario. A new version of a popular content management system is about to be released. Everything that the developers on the team have contributed since the last release is now being used together for the first time. The tension is rising! Will everything work? Will all tests be successful - if the project integrates tests at all. Or will the release of the new version have to be postponed again and nerve-wracking hours of bug-fixing lie ahead? By the way, postponing the release date is also not good for the image of the software product! No developer likes to experience this scenario. It is much better to know at any time in which state the software project is currently? Code that do not fit in with the existing one should only be integrated after they have been "made to fit". Especially in times when it is more and more common that a security gap has to be fixed, a project should always be able to create a release! And this is where continuous integration comes into play.
In continuous integration, individual elements of the software are permanently integrated. The software is created and tested in small cycles. In this way, you encounter problems during integration or faulty tests at an early stage and not days or weeks later. With successive integration, troubleshooting is much easier because errors are discovered close to the time of programming and usually only a small part of the program is affected. Joomla integrates new code using continuous integration. New code is integrated only when all tests are passed.
With a continuous integration of new software, troubleshooting is much easier because the errors are discovered close to the time of programming and usually only a small part of the program is affected.
To ensure that you have tests for all program parts available at all times during continuous integration, you should develop test-driven software.
Test-Driven Development (TDD)
Test-driven development is a programming technique that uses developing in small steps. First you write the test code. Only then you do create the program code to be tested. Any change to the program is made only after the test code for that change has been created. So your tests fail immediately after creation. The required function is not yet implemented in the program. Only then do you create the actual program code - that is, the program code that satisfies the test.
The TDD tests help you to write the program correctly.
When you first hear about this technique, you may not be comfortable with the concept. ""Human"" always wants to do something productive first, after all. And writing tests doesn't seem productive at first glance. Try it out. Sometimes you become friends with a new technique only after getting to know it! In projects with high test coverage, I feel more comfortable when I add new features.
If you go through the exercise part at the end of the text, you can try it out. First create the test and then write the code for Joomla Core. Then submit everything together as a PR on Github. If everyone would do this, Joomla would have ideal test coverage.
Behaviour-driven-development (BDD)
BDD is not another programming technique or testing technique, but a kind of best practice for software development. BDD is ideally used together with TDD. In principle, Behaviour-Driven-Development stands for testing not the implementation of the program code, but the execution - i.e. the behavior of the program. A test checks whether the specification, i.e. the customer's requirement, is fulfilled.
When you develop software in a behavior-driven way, tests not only help you write the program correctly. Tests also help you write the right program.
What do I mean by that: "Write the right program"? It happens that users see things differently than developers. The workflow of deleting an article in Joomla is an example. Again and again I meet users who click on the status icon in the trash and are surprised. The user usually intuitively assumes that the item is now permanently deleted, but it is toggeled from trashed to activ. For the developer, clicking on the status icon is a change of status, a toggel. This is technically the case in all other views. Why should this be different in the trash bin? For the developer, the function is implemented without errors. Joomla works correctly. But in my eyes the function is not the right one at that place, because most users would describe/request it quite differently.
In Behaviour Driven Development, the requirements for the software are described through examples called scenarios or user stories. Characteristics of Behaviour Driven Development are
- a strong involvement of the end user in the development process of the software,
- the documentation of all project phases with user stories/case examples in text form - usually in the description language in the description language Gherkin,
- automatic testing of these user stories/case studies,
- successive implementation. Thus, a description of the software to be implemented can be accessed at any time. With the help of this description, you can continuously ensure the correctness of the already implemented program code.
The Joomla project has introduced BDD in a Google Summer of Code project. It was hoped that users without programming knowledge would be able to participate more easily using Gherkin). The approach was not followed up consistently. At that time, Joomla used Codeception as a testing tool. With Cypress, BDD development is also possible to develop in the BDD way.
Planing
Test types
- Unit tests: A unit test is a test that tests smallest program units independently.
- Integration tests: An integration test is a test that tests the interaction of individual units.
- E2E Tests or Acceptance Tests: An acceptance test checks whether the program fulfills the task defined at the beginning.
Strategie
If you want to add a new function in Joomla and secure it with tests, you can proceed in two ways.
Top-down and bottom-up are two fundamentally different approaches to understanding and presenting complex issues. Top-down goes step by step from the abstract and general to the concrete and specific. To illustrate this with an example: A content management system like Joomla generally presents websites in a browser. Concretely, however, there are a number of small subtasks in this process. One of them is the task of displaying a specific text in a heading.
Bottom-up describes the opposite direction: at this point it is worth remembering once again that one element of behavior-driven development is the creation of a textual description of the software's behavior. This description of acceptance criteria helps to create tests - especially the top-level end-to-end tests or acceptance tests.
The usual approach to creating tests today is from the bottom. If you prefer behavior-driven software development, you should use the opposite strategy. You should use the top-down strategy. With a top-down strategy, a misunderstanding is identified early on in the design phase.
-
Top-down testing: When applying the top-down strategy, one starts with the acceptance tests - i.e. with the part of the system that is most closely linked to the user requirements. For software written for human users, this is usually the user interface. The focus is on testing how a user interacts with the system. A disadvantage of top-down testing is that a lot of time has to be spent on creating test duplicates. Components that are not yet integrated have to be replaced by placeholders. There is no real program code at the beginning. Therefore, missing parts have to be created artificially. Gradually, this artificial data is then replaced by really calculated data.
-
Bottom-up testing: If you follow the bottom-up strategy, you start with unit tests. At the beginning, the developer has the target state in mind. However, he then first breaks down this target into individual components. The problem with the bottom-up approach is that it is difficult to test how a component will later be used in real situations. The advantage of bottom-up testing is that we have finished software parts very quickly. However, these parts should be used with caution. They do work correctly. This is what the unit tests ensure. But whether the end result is really what the customer imagines the software to be is not ensured.
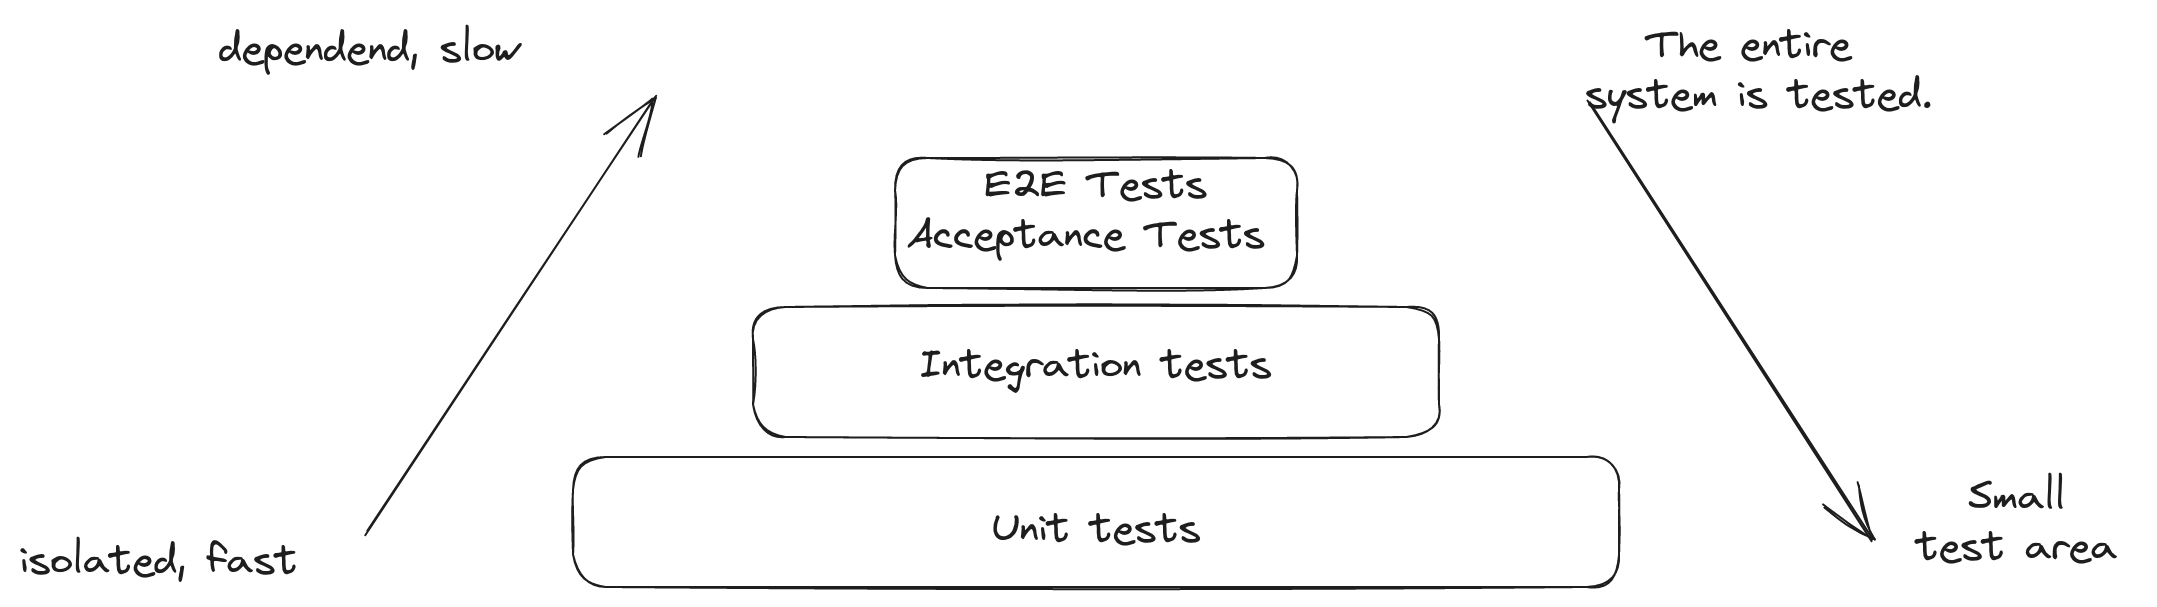
The test pyramid by Mike Cohn
How many tests should be implemented of which test type? The test pyramid of Mike Cohn describes a concept for the employment of the automated software tests. The pyramid consists of three levels, structured according to frequency of use and relevance.
Ideally, the base of the test pyramid is formed by many quick and easy-to-maintain unit tests. In this way, most errors can be detected fast.
At the middle level are the integration tests. They provide services for the targeted testing of critical interfaces. The execution times of integration tests are longer and their maintenance is also more complex than that of unit tests.
The top of the pyramid consists of slow E2E tests, which sometimes require a lot of maintenance. E2E tests are very useful for testing the application as a complete system.
Requirements
What equipment do you need for working on the following practical part?
Which requirements do you have to work on the following practical part actively? You do not have to meet very many requirements to be able to work on the contents of this manual. Of course, you must have a computer. A development environment with Git, NodeJS and Composer and a local web server should be installed or installable on it.
What knowledge should you personally have?
You should know basic programming techniques. Ideally, you have already programmed a small web application. In any case, you should know where to store files on your development computer and how to load them in your internet browser. Most importantly, you should enjoy trying out new things.
Try it out. Integrate tests into your next project. Maybe your first experience of a test will save you a tedious debugging session or an embarrassing bug in the real system. After all, with a safety net of tests, you can develop software with less stress.
Setting up
Setting up Cypress with Joomla!
In the developer version available on Github, Joomla is Cypress ready configured. There are already tests that you can use as a guide. So it is not necessary to set up everything yourself to get a first overview. This way, you can experiment with Cypress, learn about its advantages and disadvantages, and decide for yourself whether you want to use the test tool.
Steps to set up the local environment:
Clone the repository to the root of your local web server:
$ git clone https://github.com/joomla/joomla-cms.git
Navigate to the joomla-cms folder:
$ cd joomla-cms
According to Joomla Roadmap the next major version 5.0 will be released in October 2023. To be up to date, I use this development version here.
Change to the branch 5.0-dev:
$ git checkout 5.0-dev
Install all needed composer packages:
$ composer install
Install all needed npm packages:
$ npm install
For more information and help on setting up your workstation, see the Joomla documentation article "Setting Up Your Workstation for Joomla Development". For Cypress, there is information at cypress.io. But that is not necessary at this point. Joomla sets everything up for you. You just need to set up your individual data via the configuration file joomla-cms/cypress.config.js.
Set up your individual data. For this you can use the template joomla-cms/cypress.config.dist.js as orientation. In my case this file looks like this:
const { defineConfig } = require('cypress')
module.exports = defineConfig({
fixturesFolder: 'tests/cypress/fixtures',
videosFolder: 'tests/cypress/output/videos',
screenshotsFolder: 'tests/cypress/output/screenshots',
viewportHeight: 1000,
viewportWidth: 1200,
e2e: {
setupNodeEvents(on, config) {},
baseUrl: 'http://localhost/joomla-cms',
specPattern: [
'tests/cypress/integration/install/*.cy.{js,jsx,ts,tsx}',
'tests/cypress/integration/administrator/**/*.cy.{js,jsx,ts,tsx}',
'tests/cypress/integration/module/**/*.cy.{js,jsx,ts,tsx}',
'tests/cypress/integration/site/**/*.cy.{js,jsx,ts,tsx}'
],
supportFile: 'tests/cypress/support/index.js',
scrollBehavior: 'center',
browser: 'firefox',
screenshotOnRunFailure: true,
video: false
},
env: {
sitename: 'Joomla CMS Test',
name: 'admin',
email: This email address is being protected from spambots. You need JavaScript enabled to view it. ',
username: 'admin',
password: 'adminadminadmin',
db_type: 'MySQLi',
db_host: 'mysql',
db_name: 'test_joomla',
db_user: 'root',
db_password: 'root',
db_prefix: 'j4_',
},
})Concretely I added the directory tests/cypress/integration/module/**/*.cy.{js,jsx,ts,tsx} to the specPattern Array, because I want to save test for modules there later. Then I changed the username and passwords because I also want to test the installation manually and remember the self-assigned ones better. I use a Docker container as database. Therefore I changed the database server and the access data. And finally I had to set the root URL http://localhost/joomla-cms of my Joomla installation.
Use Cypress
Via Webbrowser
Call npm run cypress:open via CLI in your Joomla root directory. A short time later the Cypress app will open. We have previously created the file joomla-cms/cypress.config.dist.js. That this is detected can be seen from the fact that E2E Testing is specified as configured.
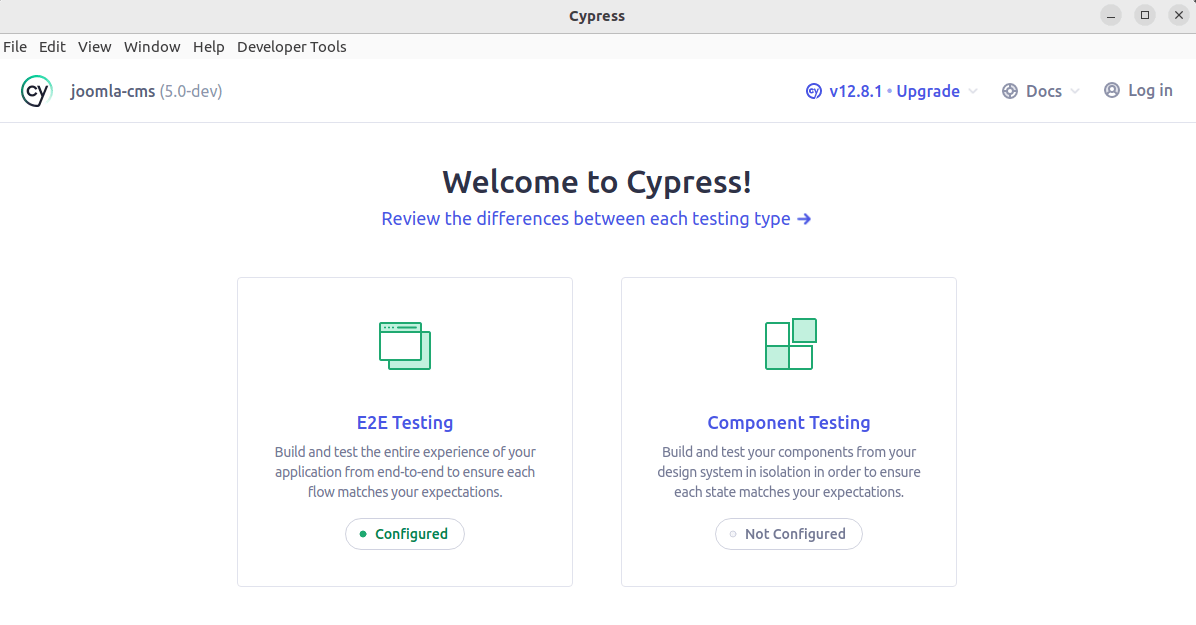
Here you can choose whether you want to run the E2E tests and which browser you want to use. For the example, I chose the "Start Testing in Firefox" option.

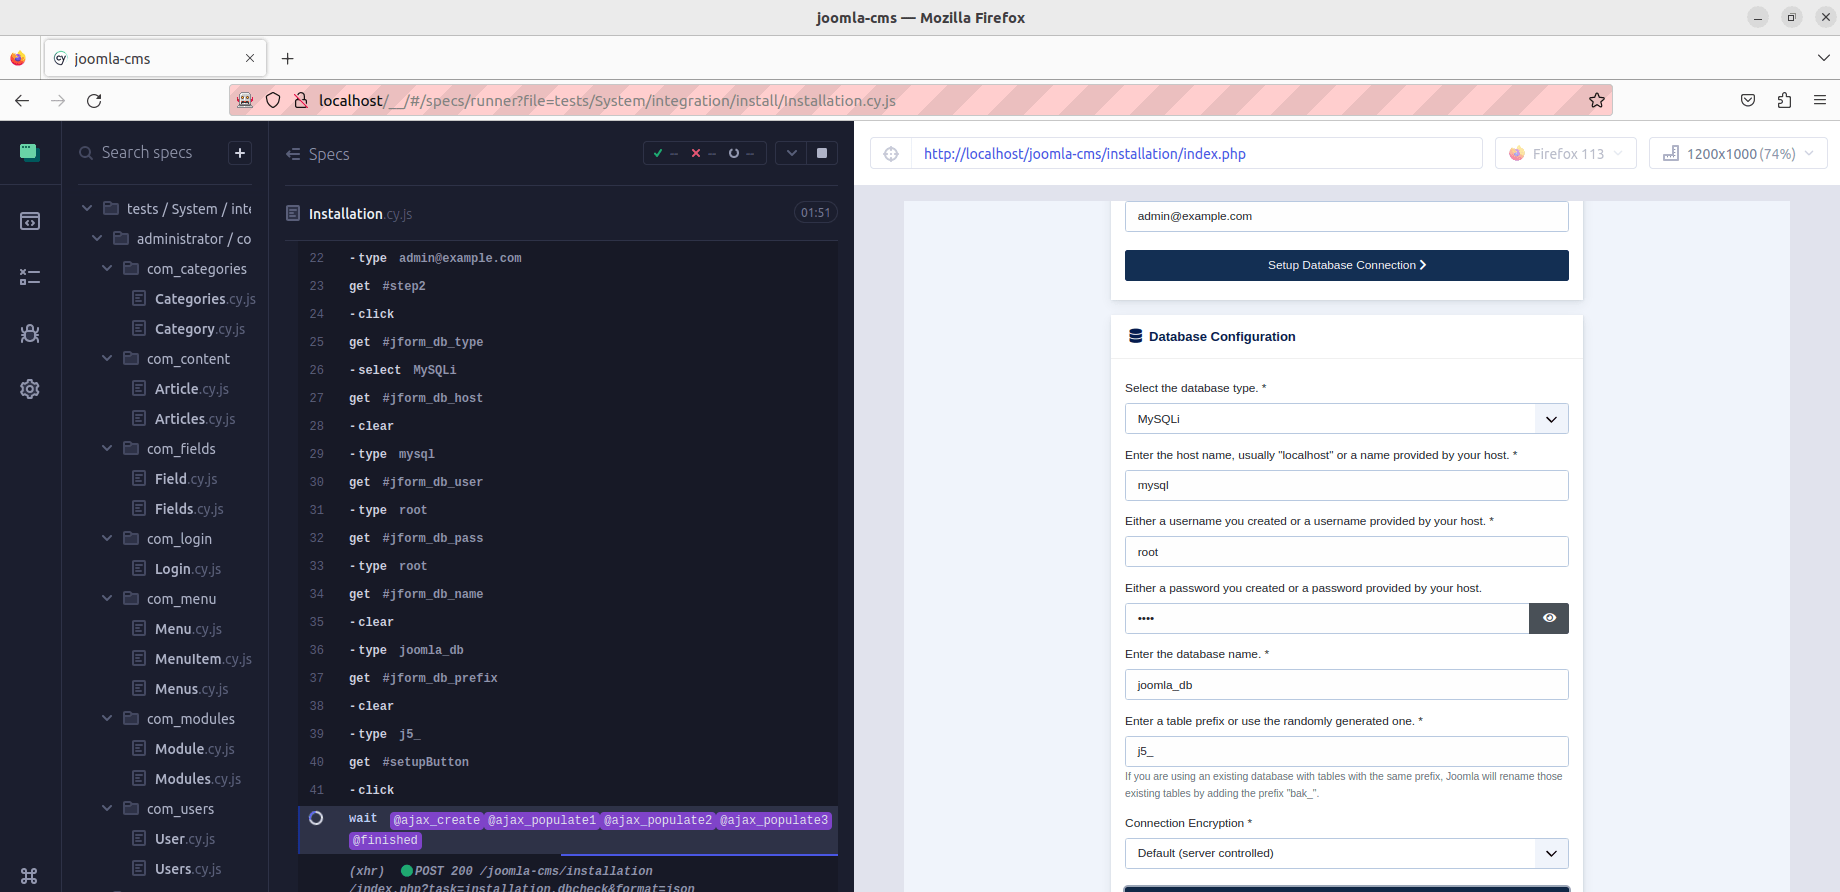
All available test suites will be listed and you can click on the one you want to run. When you select a test suite, the tests will run and you can view the running of the tests in real time in the browser.
![]()
While the tests are running, you can see the executed script on one side and the result in the browser on the right side. These are not just screenshots, but real snapshots of the browser at that moment, so you can see the actual HTML code. Screenshots and even videos of the tests are also possible.
Try it out. If you use as db_host: 'localhost', you can test the installation and thus have configured Joomla correctly for the work on the following part of this text.
If you, like me, use an external source (not lcoalhost; I use a docker container) as db_host, the test for this kind of installation is not ready yet. In that case there is a question for security in the install routine, which is not yet considered in the tests. In this case, install Joomla manually with the information entered in the file joomla-cms/cypress.config.js. The following tests will use the settings from this configuration file, for example for logging into the Joomla administration area. This way the test developer does not have to care about entering the login data. The matching user and password is always used automatically from the configuration file.
Headless
By default, cypress run runs all tests headless. The following command executes all already coded tests and saves screenshots in the directory /joomla-cms/tests/cypress/output/screenshots in case of an error. The output directory was set in the cypress.config.js file.
$ npm run cypress:run
Other CLI Commands
There are other helpful commands that are not implemented as scripts in the package.json of the Joomla project. I execute them via npx[docs.npmjs.com/commands/npx].
cypress verify
The cypress verify command verifies that Cypress is installed correctly and can be run.
$ npx cypress verify

✔  Verified Cypress! /.../.cache/Cypress/12.8.1/Cypress
cypress info
The cypress info command outputs information about Cypress and the current environment.
$ npx cypress info
Displaying Cypress info...

Detected 2 browsers installed:

1. Chromium
  - Name: chromium
  - Channel: stable
  - Version: 113.0.5672.126
  - Executable: chromium
  - Profile: /.../snap/chromium/current

2. Firefox
  - Name: firefox
  - Channel: stable
  - Version: 113.0.1
  - Executable: firefox
  - Profile: /.../snap/firefox/current/Cypress/firefox-stable

Note: to run these browsers, pass <name>:<channel> to the '--browser' field

Examples:
- cypress run --browser chromium
- cypress run --browser firefox

Learn More: https://on.cypress.io/launching-browsers

Proxy Settings: none detected
Environment Variables: none detected

Application Data: /.../.config/cypress/cy/development
Browser Profiles: /.../.config/cypress/cy/development/browsers
Binary Caches: /.../.cache/Cypress

Cypress Version: 12.8.1 (stable)
System Platform: linux (Ubuntu - 22.04)
System Memory: 4.08 GB free 788 MB
cypress version
The cypress version command prints the installed Cypress binary version, the version of the Cypress package, the version of Electron used to create Cypress, and the bundled node version.
$ npx cypress version
Cypress package version: 12.8.1
Cypress binary version: 12.8.1
Electron version: 21.0.0
Bundled Node version: 16.16.0
Cypress' documentation provides more detailed information.
Writing the first own Test
If everything has worked so far, we can start creating our own tests.
Get an overview
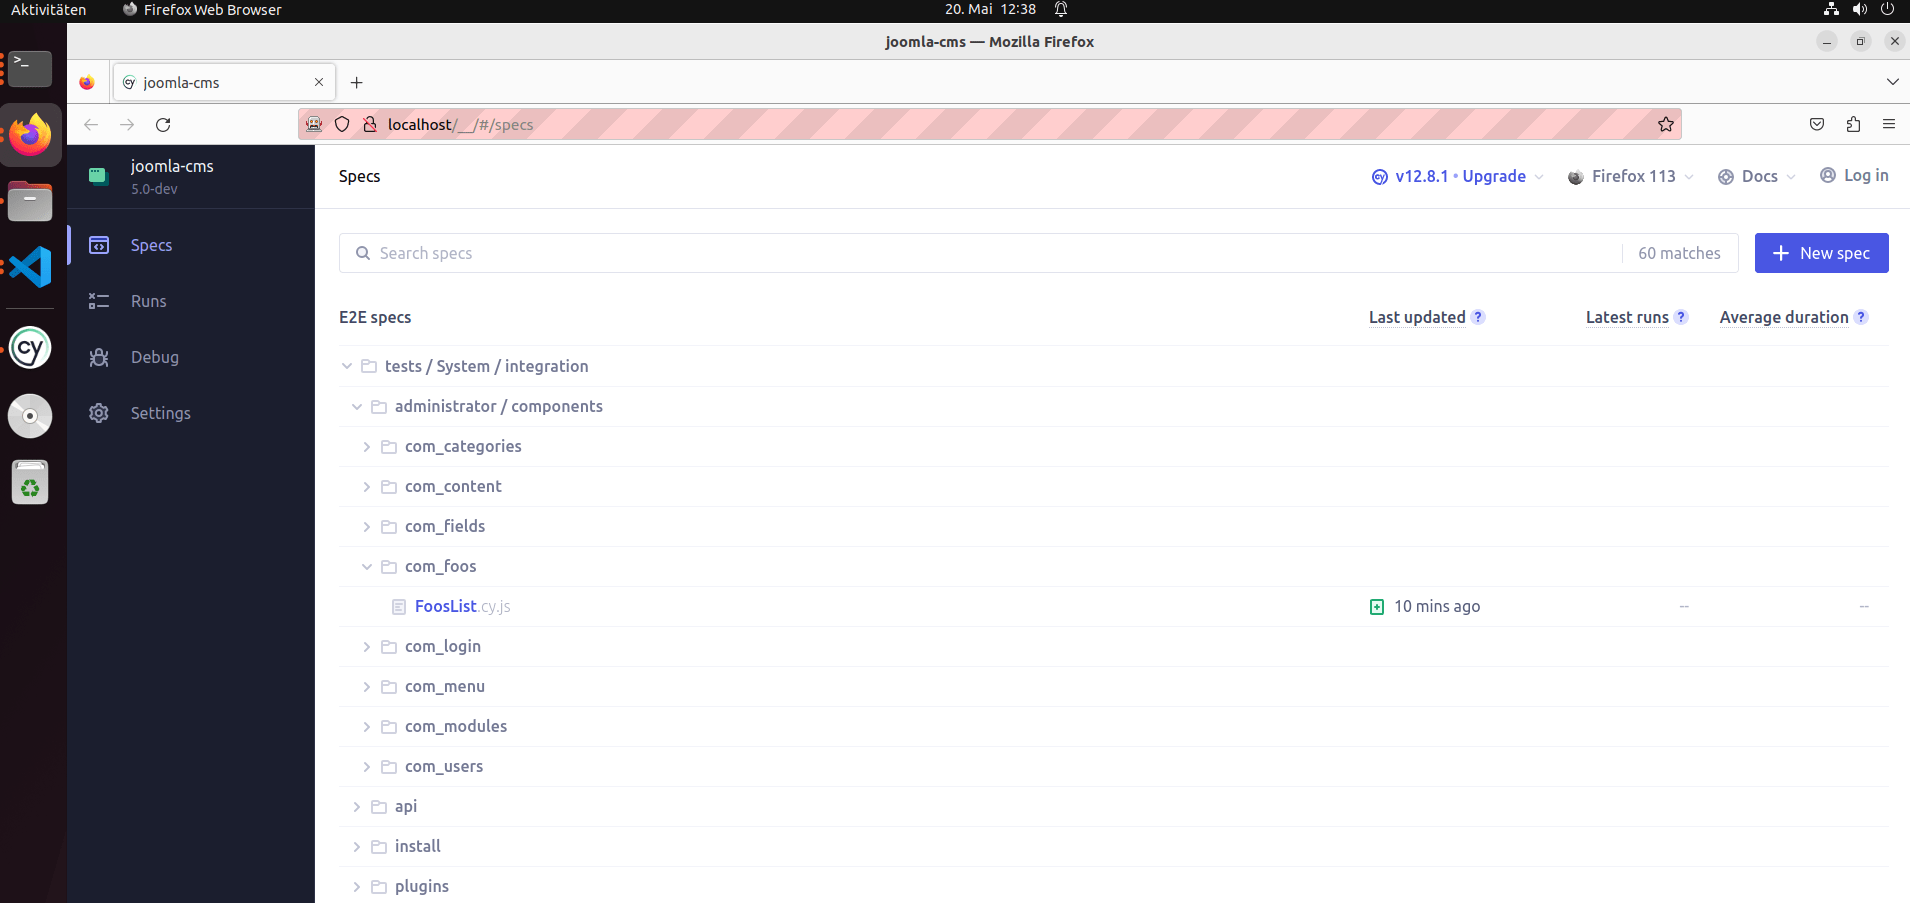
Learning from tests already developed
In the development version of the Joomla CMS there are already Cypress tests. These are in the folder /tests/System/integration. Those who like to learn by example will find a suitable introduction here.
Import code for repetitive tasks
The Joomla developers are working on the NodeJs project joomla-cypress, which provides test code for common test cases. These are imported during installation of the developer version of the CMS using npm install via
package.jsonand via the- support file
/tests/System/support/index.js. The support file is defined in the configurationcypress.config.js.
// package.json
{
  "name": "joomla",
  "version": "5.0.0",
  "description": "Joomla CMS",
  "license": "GPL-2.0-or-later",
  "repository": {
    "type": "git",
    "url": "https://github.com/joomla/joomla-cms.git"
  },
...
  "devDependencies": {
    ...
    "joomla-cypress": "^0.0.16",
    ...
  }
}
An example is the click on a toolbar button. For example, Cypress.Commands.add('clickToolbarButton', clickToolbarButton) causes the command clickToolbarButton() to be available in the custom tests and via cy.clickToolbarButton('new') a click on the button New is simulated. The code required for this is shown in the codesnipped below.
// node_modules/joomla-cypress/src/common.js
...
const clickToolbarButton = (button, subselector = null) => {
  cy.log('**Click on a toolbar button**')
  cy.log('Button: ' + button)
  cy.log('Subselector: ' + subselector)

  switch (button.toLowerCase())
  {
    case "new":
      cy.get("#toolbar-new").click()
      break
    case "publish":
      cy.get("#status-group-children-publish").click()
      break
    case "unpublish":
      cy.get("#status-group-children-unpublish").click()
      break
    case "archive":
      cy.get("#status-group-children-archive").click();
      break
    case "check-in":
      cy.get("#status-group-children-checkin").click()
      break
    case "batch":
      cy.get("#status-group-children-batch").click()
      break
    case "rebuild":
      cy.get('#toolbar-refresh button').click()
      break
    case "trash":
      cy.get("#status-group-children-trash").click()
      break
    case "save":
      cy.get("#toolbar-apply").click()
      break
    case "save & close":
      cy.get(".button-save").contains('Save & Close').click()
      break
    case "save & new":
      cy.get("#save-group-children-save-new").click()
      break
    case "cancel":
      cy.get("#toolbar-cancel").click()
      break
    case "options":
      cy.get("#toolbar-options").click()
      break
    case "empty trash":
    case "delete":
      cy.get("#toolbar-delete").click()
      break
    case "feature":
      cy.get("#status-group-children-featured").click()
      break
    case "unfeature":
      cy.get("#status-group-children-unfeatured").click()
      break
    case "action":
      cy.get("#toolbar-status-group").click()
      break
    case "transition":
      cy.get(".button-transition.transition-" + subselector).click()
      break
  }

  cy.log('--Click on a toolbar button--')
}

Cypress.Commands.add('clickToolbarButton', clickToolbarButton)
...
The following code shows another example, the login to the administration area.
// /node_modules/joomla-cypress/src/user.js
...
const doAdministratorLogin = (user, password, useSnapshot = true) => {
  cy.log('**Do administrator login**')
  cy.log('User: ' + user)
  cy.log('Password: ' + password)

  cy.visit('administrator/index.php')
  cy.get('#mod-login-username').type(user)
  cy.get('#mod-login-password').type(password)
  cy.get('#btn-login-submit').click()
  cy.get('h1.page-title').should('contain', 'Home Dashboard')

  cy.log('--Do administrator login--')
}

Cypress.Commands.add('doAdministratorLogin', doAdministratorLogin)

...
Common tasks in the individual environment
In the directory /tests/System/support you will find common tasks in the individual environment. So that these can be easily reused, they are imported via the support file /tests/System/support/index.js. An example of a frequently repeated task is the login to the administration area, which is handled in the file /tests/System/support/commands.js using the function doAdministratorLogin.
The following code also shows how the information from the cypress.config.js configuration is used in the tests. Cypress.env('username') is assigned the value of the username property within the group env.
Also, we can see here how to overwrite commands. Cypress.Commands.overwrite('doAdministratorLogin' ...), overwrites the code we just saw in the package joomla-cypress. The advantage is that user and password are automatically used from the individual configuration.
// /tests/System/support/commands.js
...
Cypress.Commands.overwrite('doAdministratorLogin', (originalFn, username, password, useSnapshot = true) => {
  // Ensure there are valid credentials
  const user = username ?? Cypress.env('username');
  const pw = password ?? Cypress.env('password');

  // Do normal login when no snapshot should be used
  if (!useSnapshot) {
    // Clear the session data
    Cypress.session.clearAllSavedSessions();

    // Call the normal function
    return originalFn(user, pw);
  }

  // Do login through the session
  return cy.session([user, pw, 'back'], () => originalFn(user, pw), { cacheAcrossSpecs: true });
});
...
Install own Joomla Extension
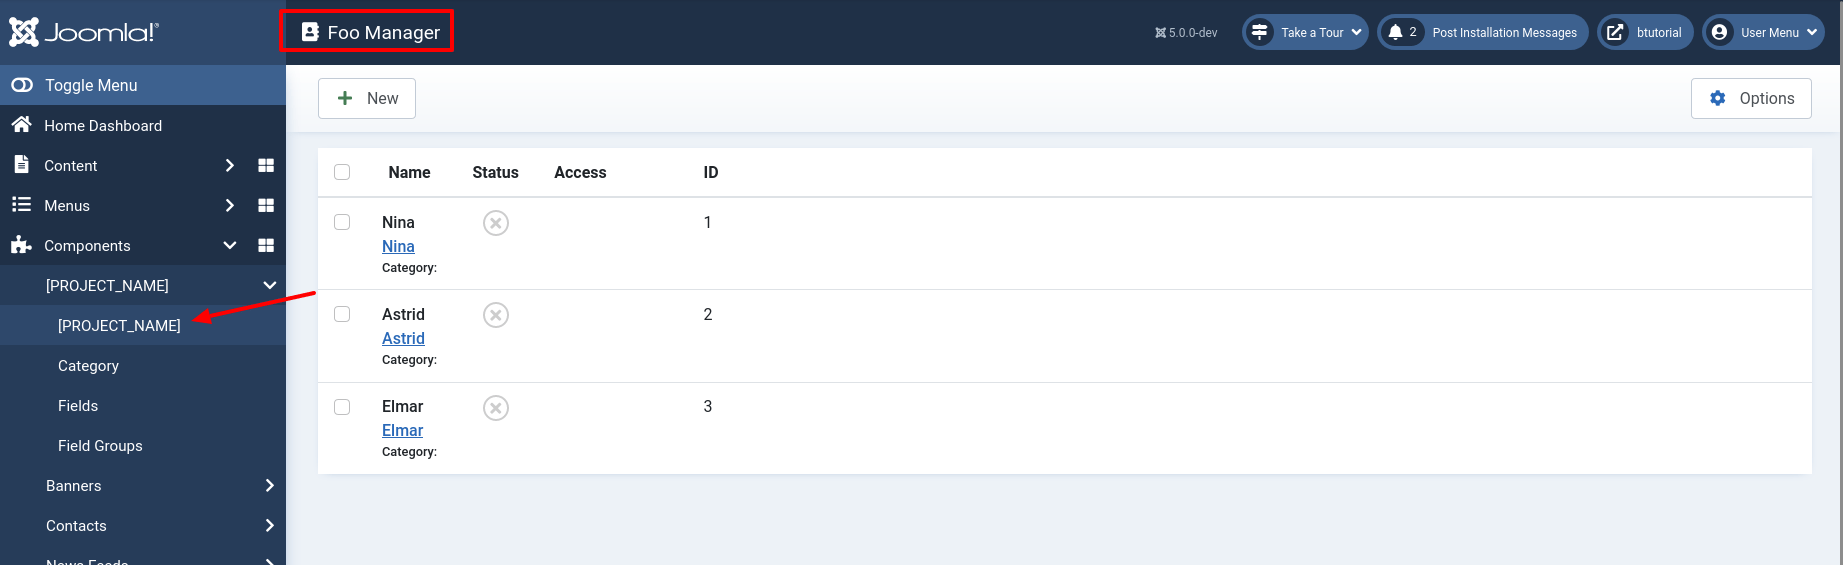
In order to see how to test your own code, we will install a simple example component via the Joomla backend. The file for installation can be downloaded from Codeberg.
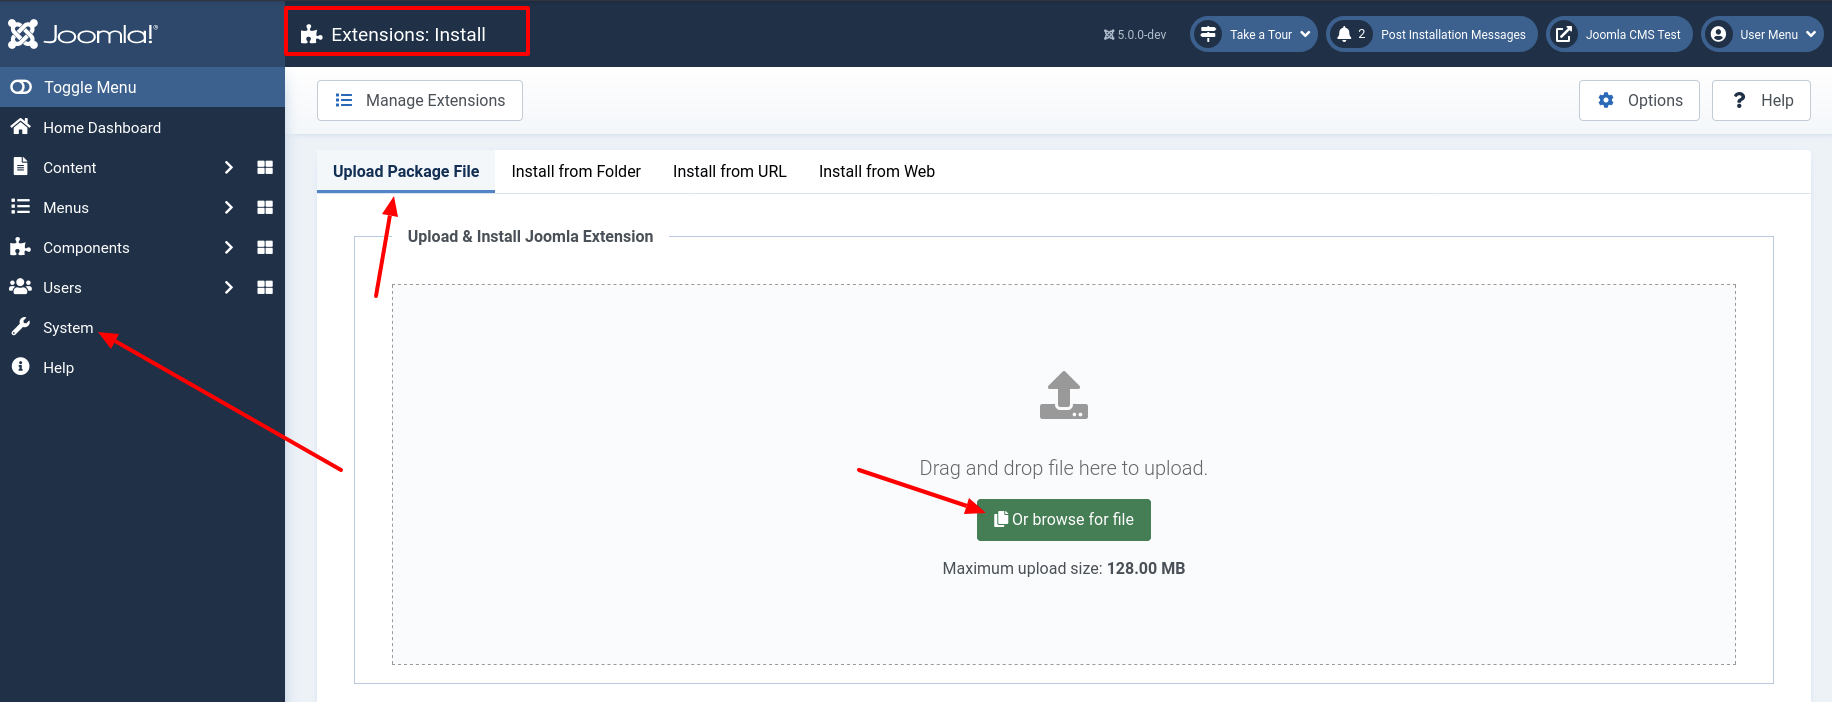
After installation, you can find a link to the view of the Foo component in the left sidebar of the Joomla backend.
We now have a test environment set up and code for to test.
The first own test
Hooks
When testing the backend, you will notice that you have to start each test with a login. We can prevent this redundant code by using the beforeEach() function. This so-called hook executes the code we enter before each test is run. Hence the name beforeEach().
Cypress provides several types of hooks, including before and after hooks that run before or after the tests in a test group, and beforeEach and afterEach hooks that run before or after each individual test in the group. Hooks can be defined globally or within a specific described block. The next code example in the file tests/System/integration/administrator/components/com_foos/FoosList.cy.js causes a login to be performed in the backend before each test within the described block test com_foos features.
We now start with the practical part and create the file tests/System/integration/administrator/components/com_foos/FoosList.cy.js with the next codesnippted before writing the first productive test. Our first example should successfully log us into the backend before any test! We will test this after creating the first test.
// tests/System/integration/administrator/components/com_foos/FoosList.cy.js

describe('Test com_foos features', () => {
  beforeEach(() => {
    cy.doAdministratorLogin()
  })

})
Note: Hooks, that are implemented within file /tests/System/support/index.js, are apply to each test file in the test suit.
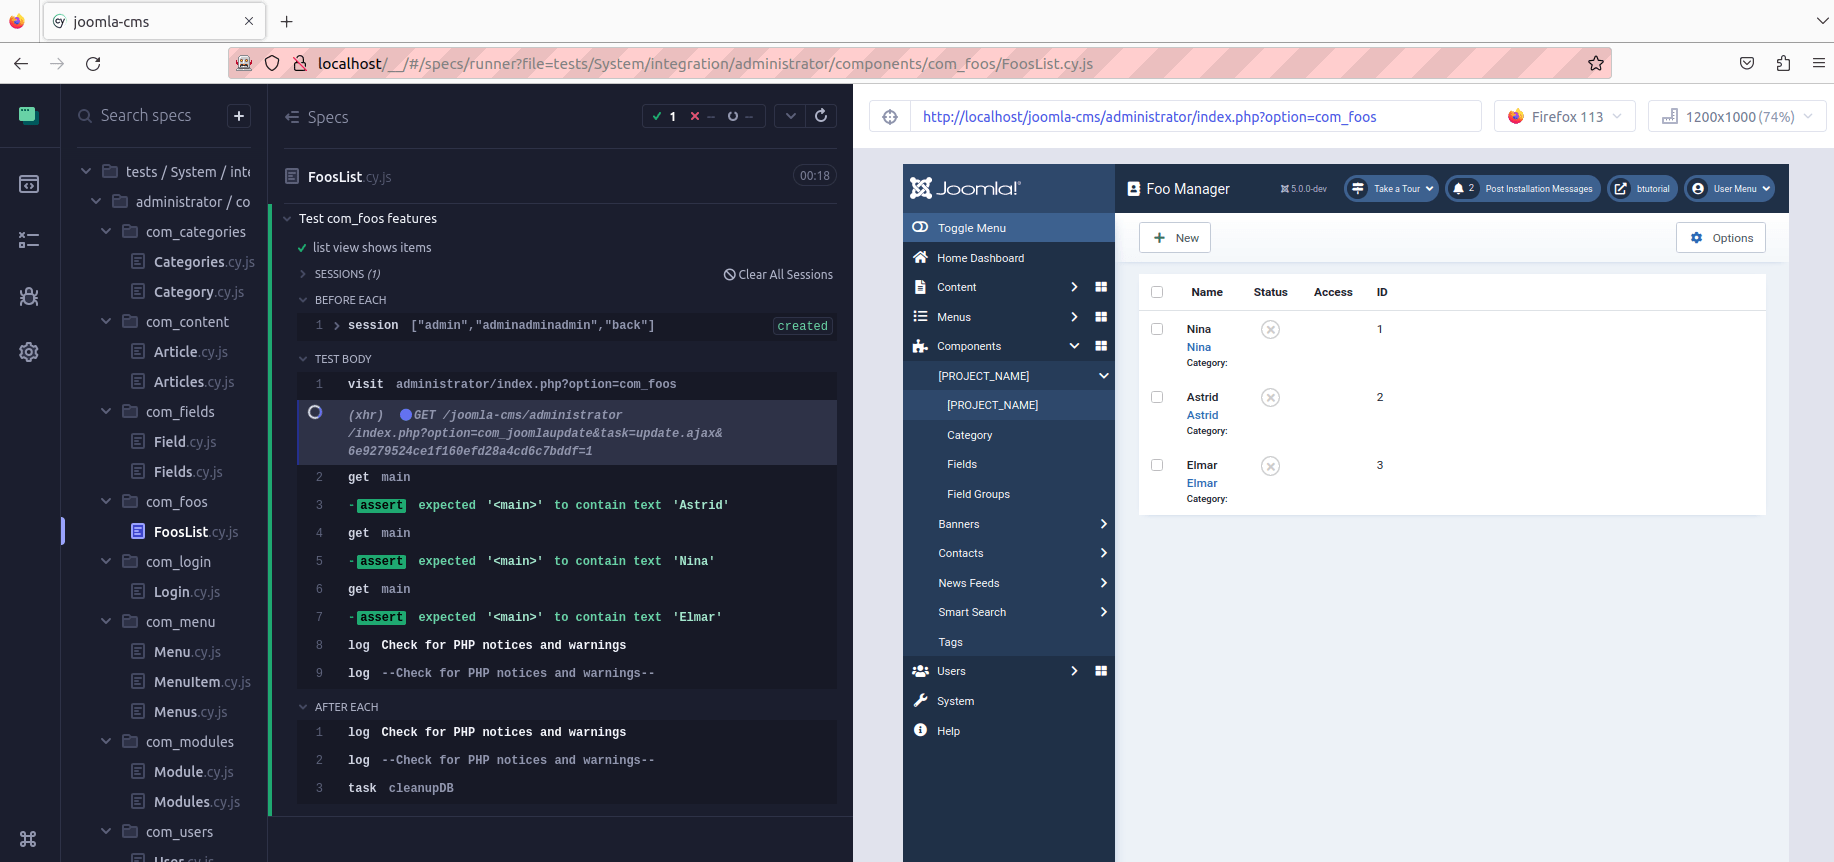
A successful test
The component we installed for testing contains the three elements Astrid, Nina and Elmar. First, we test whether these elements were created successfully.
// tests/System/integration/administrator/components/com_foos/FoosList.cy.js

describe('Test com_foos features', () => {
  beforeEach(() => {
    cy.doAdministratorLogin()
  })

  it('list view shows items', function () {
    cy.visit('administrator/index.php?option=com_foos')

    cy.get('main').should('contain.text', 'Astrid')
    cy.get('main').should('contain.text', 'Nina')
    cy.get('main').should('contain.text', 'Elmar')

    cy.checkForPhpNoticesOrWarnings()
  })
})
Note: The function checkForPhpNoticesOrWarnings() you find in the file /node_modules/joomla-cypress/src/support.js.
We get the DOM element main via the Cypress command get
You should find your just created test FooList.cy.js in the list of the available tests in the left sidebar. If this is not the case, please close the browser and run npm run cypress:open again.
Click on the name of the test for runnig it. It should end successful and you see see green messages.
A failed test
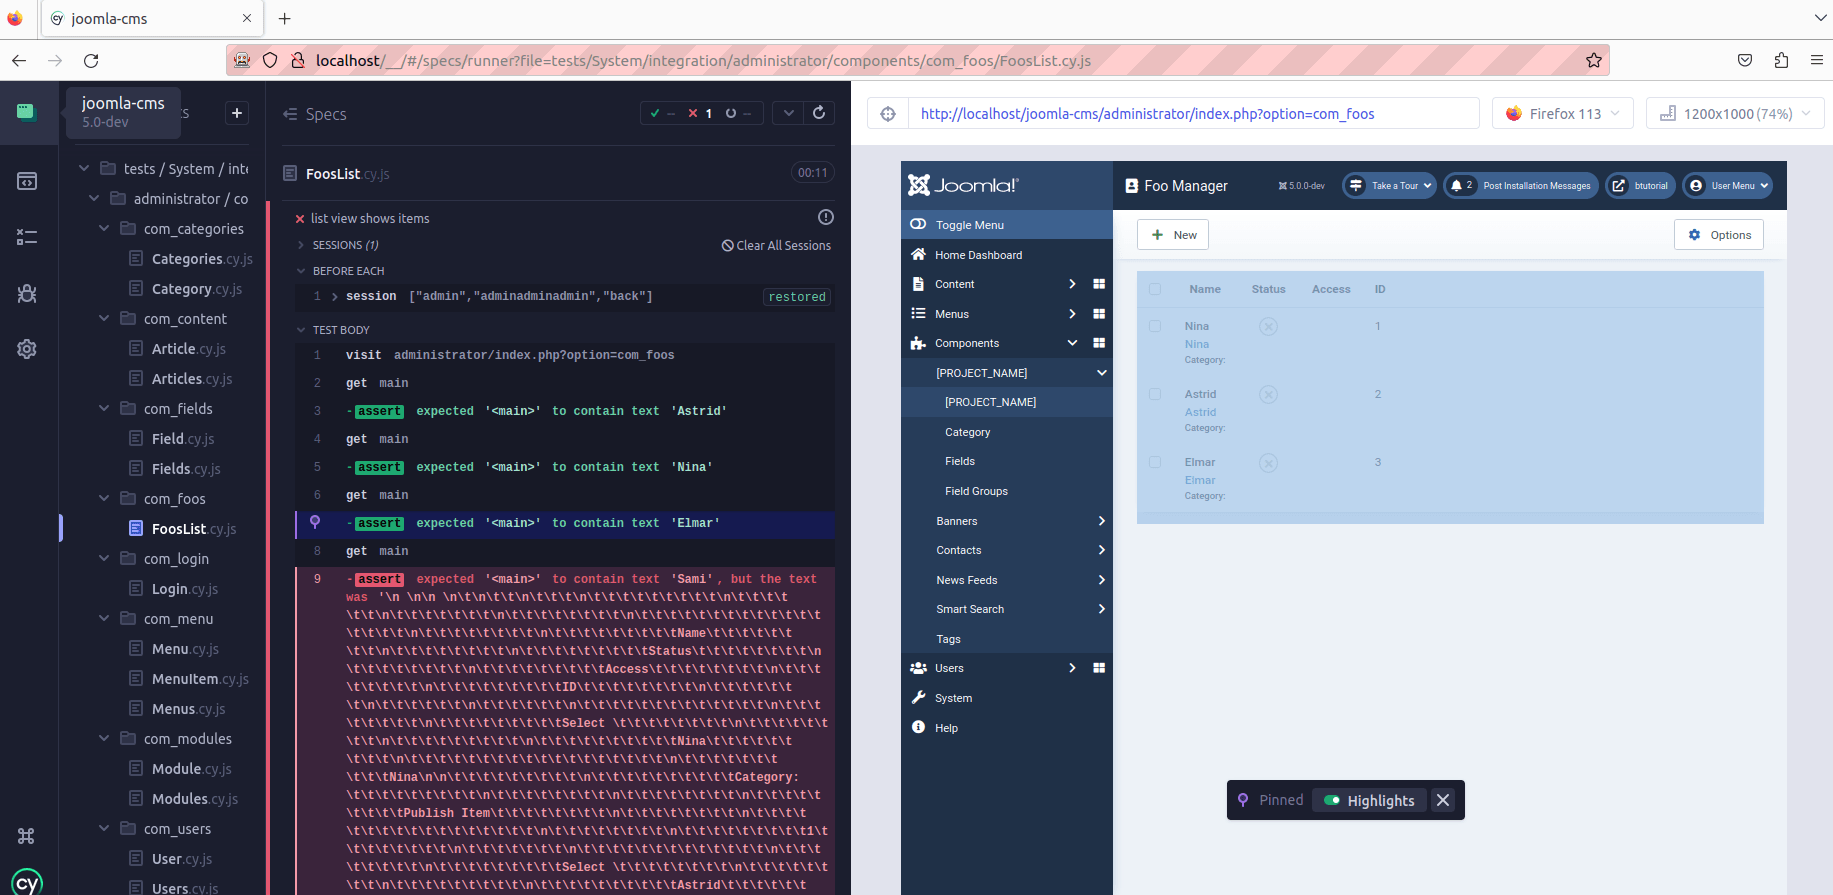
Add the line cy.get('main').should('contain.text', 'Sami') to the test file so that the run fails. There is no element with this name. After saving the test file, Cypress notice the change. After each change, Cypress automatically reruns all the tests in the test file.
// tests/System/integration/administrator/components/com_foos/FoosList.cy.js
describe('Test com_foos features', () => {
  beforeEach(() => {
    cy.doAdministratorLogin()
  })

  it('list view shows items', function () {
    cy.visit('administrator/index.php?option=com_foos')

    cy.get('main').should('contain.text', 'Astrid')
    cy.get('main').should('contain.text', 'Nina')
    cy.get('main').should('contain.text', 'Elmar')
    cy.get('main').should('contain.text', 'Sami')

    cy.checkForPhpNoticesOrWarnings()
  })
})
As expected, the test fails. There are red messages. You can see the code of each test step in the left sidebar. So it is possible to find the reason for the error. For each step there is a snapshot of the HTML document, so you can check the markup at any time. This is helpful, especially during development.
Run only one test in a file
Our demo extension contains more than one layout. Add a test for testing the empty state layout. Since we now have two tests in this file, Cypress will always run both tests every time we save the file. We can use .only() so that only one test is executed:
// tests/System/integration/administrator/components/com_foos/FoosList.cy.js

describe('Test com_foos features', () => {
    beforeEach(() => {
        cy.doAdministratorLogin()
    })

    it('list view shows items', function () {
        cy.visit('administrator/index.php?option=com_foos')

        cy.get('main').should('contain.text', 'Astrid')
        cy.get('main').should('contain.text', 'Nina')
        cy.get('main').should('contain.text', 'Elmar')

        cy.checkForPhpNoticesOrWarnings()
    })

    it.only('emptystate layout', function () {
        cy.visit('administrator/index.php?option=com_foos&view=foos&layout=emptystate')
        cy.get('main').should('contain.text', 'No Foo have been created yet.')
    })
})
During development, this is very convenient.
Special test attributes
Now we like to test the frontend for our component. We do this in a separate file /tests/System/integration/site/components/com_foos/FooItem.cy.js.
Most of the time we use a CSS class to get an elements in Joomla tests. While this is perfectly valid and will work, it is not actually recommended. Why not? When you use CSS classes or IDs, you bind your tests to things that will most likely change over time. Classes and IDs are for design, layout and sometimes via JavaScript for control, which can easily change. If someone changes a class name or ID, your tests will no longer work. To make your tests less brittle and more future-proof, Cypress recommends creating special data attributes for your elements specifically for testing purposes.
I will use the data-test attribute for the elements. First I add the attribute data-test="foo-main" to the production code.
// /components/com_foos/tmpl/foo/default.php
<?php
\defined('_JEXEC') or die;
?>
<div data-test="foo-main">
Hello Foos
</div>
Then I test the production code by searching for the attribute [data-test="foo-main"].
// tests/System/integration/site/components/com_foos/FooItem.cy.js
describe('Test com_foo frontend', () => {
  it('Show frondend via query in url', function () {
    cy.visit('index.php?option=com_foos&view=foo')

    cy.get('[data-test="foo-main"]').should('contain.text', 'Hello Foos')

    cy.checkForPhpNoticesOrWarnings()
  })
})
Testing a menu item and some thoughts on events, waits and best practice
Now I like to test the creation of a menu item for our component. I do this in a separate file /tests/System/integration/administrator/components/com_foos/MenuItem.cy.js. This code is complex and shows a lot of special features.
First, I defined a constant in which I set all the relevant properties of the menu item. This has the advantage that in case of changes of an relevant propertie I have to adjust only in one place:
const testMenuItem = {
  'title': 'Test MenuItem',
  'menuitemtype_title': 'COM_FOOS',
  'menuitemtype_entry': 'COM_FOOS_FOO_VIEW_DEFAULT_TITLE'
}
Next you see the whole code of the file MenuItem.cy.js:
// tests/System/integration/administrator/components/com_foos/MenuItem.cy.js

describe('Test menu item', () => {
  beforeEach(() => {
    cy.doAdministratorLogin(Cypress.env('username'), Cypress.env('password'))
  })

  it('creates a new menu item', function () {
    const testMenuItem = {
      'title': 'Test MenuItem',
      'menuitemtype_title': 'COM_FOOS',
      'menuitemtype_entry': 'COM_FOOS_FOO_VIEW_DEFAULT_TITLE'
    }

    cy.visit('administrator/index.php?option=com_menus&view=item&client_id=0&menutype=mainmenu&layout=edit')
    cy.checkForPhpNoticesOrWarnings()
    cy.get('h1.page-title').should('contain', 'Menus: New Item')

    cy.get('#jform_title').clear().type(testMenuItem.title)

    cy.contains('Select').click()
    cy.get('.iframe').iframe('#collapse1-heading').contains(testMenuItem.menuitemtype_title).click()
    cy.get('.iframe').iframe('#collapse1-heading').contains(testMenuItem.menuitemtype_entry).click()

    cy.intercept('index.php?option=com_menus&view=items&menutype=mainmenu').as('item_list')
    cy.clickToolbarButton('Save & Close')
    cy.wait('@item_list')
    cy.get('#system-message-container').contains('Menu item saved.').should('exist')

    // Frontend
    cy.visit('index.php')
    cy.get('.sidebar-right').contains(testMenuItem.title).click()
    cy.get('[data-test="foo-main"]').should('contain.text', 'Hello Foos')
    cy.checkForPhpNoticesOrWarnings()

    // Trash
    cy.visit('administrator/index.php?option=com_menus&view=items&menutype=mainmenu')
    cy.searchForItem(testMenuItem.title)
    cy.checkAllResults()
    cy.clickToolbarButton('Action')
    cy.intercept('index.php?option=com_menus&view=items&menutype=mainmenu').as('item_trash')
    cy.clickToolbarButton('trash')
    cy.wait('@item_trash')
    cy.get('#system-message-container').contains('Menu item trashed.').should('exist')

    // Delete
    cy.visit('administrator/index.php?option=com_menus&view=items&menutype=mainmenu')
    cy.setFilter('published', 'Trashed')
    cy.searchForItem(testMenuItem.title)
    cy.checkAllResults()
    cy.on("window:confirm", (s) => {
      return true;
    });
    cy.intercept('index.php?option=com_menus&view=items&menutype=mainmenu').as('item_delete')
    cy.clickToolbarButton('empty trash');
    cy.wait('@item_delete')
    cy.get('#system-message-container').contains('Menu item deleted.').should('exist')
  })
})
- In this code you can see an example of testing something and then deleting everything - thus restoring the initial state. This way you can repeat the tests as many times as you want. Without restoring the initial state, the second test run will fail because Joomla cannot store two similar elements.
Note: A test should be:
- repeatable.
- kept simple. In concrete terms, this means that it should test a limited problem and the code for this should not be too extensive.
- independent from other tests.
- And you can see how to use an intercepted route defined with
cy.intercept()[^docs.cypress.io/api/commands/intercept] as an alias, and then wait for the route defined as an alias withcy.wait().
When writing tests for such applications, one is tempted to use random values such as
cy.wait(2000);in thecy.waitcommand. The problem with this approach is that while this may work well in development. However, it is not guaranteed to always work. Why? Because the underlying system depends on things that are hard to predict. Therefore, it is always better to define exactly what you are waiting for.
- The code also shows how to wait for an alert and confirm it.
cy.on("window:confirm", (s) => {
  return true;
});
- Last but not least, the test code contains Cypress build in and Joomla-typical functions that can be reused by extension developers. For example,
cy.setFilter('published', 'Trashed')orcy.clickToolbarButton('Save & Close')are functions in which solutions for individual tests can be found in general and which Joomla developers in particular often need.Mixing Async and Sync Code
Cypress commands are asynchronous, that is, they do not return a value, but
generateit. When we start Cypress, it does not execute the commands immediately, but reads them serially and queues them. If you mix asynchronous and synchronous code in tests, you may get unexpected results. If you run the following code, you will get an error against expectation. Surely you would also have expected thatmainText = $main.text()changes the valuemainText. ButmainText === 'Initial'is still valid at the end. Why is that? Cypress first executes the synchronous code at the beginning and at the end. Only then it calls the asynchronous part insidethen(). That means, the variablemainTextis initialized and immediately afterwards it is checked, if it has changed - which of course is not the case.let mainText = 'Initial'; cy.visit('administrator/index.php?option=com_foos&view=foos&layout=emptystate') cy.get("main").then( ($main) => (mainText = $main.text()) ); if (mainText === 'Initial') { throw new Error(`Der Text hat sich nicht geändert. Er lautet: ${mainText}`); }The processing of the queue becomes quite clear and visual if one observes the execution of the following code in the console of the browser. The text 'Cypress Test.' appears long before the content of the
mainelement is shown, although the lines of code are in a different order.cy.get('main').then(function(e){ console.log(e.text()) }) console.log('Cypress Test.')Stubs and Spies
A
stubis a way to simulate the behavior of the function on which the tests depend. Instead of calling the actual function, the stub replaces that function and returns a predefined object. It is usually used in unit tests, but can also be used for end-to-end testing.A
spyis similar to thestub, but not exactly the same. It does not change the behavior of a function, but leaves it as it is. It captures some information about how the function is called. For example, to check if the function is called with the correct parameters, or to count how often the function is called.The following example shows a
spyand astubin action. Viaconst stub = cy.stub()we create thestubelement and determine in the next step thatfalseis returned for the first call andtruefor the second. Usingcy.on('window:confirm', stub)we make thestubbe used forwindow:confirm'. In the next step we create withcy.spy(win, 'confirm').as('winConfirmSpy')theSpyelement, which observes the call of'window:confirm'. Now we test that on the first call the deletion of the category is rejected and on the second call it is confirmed. In doing so, thestubensures that we can expect for sure what return values will be delivered.'window:confirm'is encapsulated.@winConfirmSpyhelps to ensure that the function was actually called - and how often it was called.// tests/System/integration/administrator/components/com_foos/FoosList.cy.js ... const stub = cy.stub() stub.onFirstCall().returns(false) stub.onSecondCall().returns(true) cy.on('window:confirm', stub) cy.window().then(win => { cy.spy(win, 'confirm').as('winConfirmSpy') }) cy.intercept('index.php?option=com_categories&view=categories&extension=com_foos').as('cat_delete') cy.clickToolbarButton('empty trash'); cy.get('@winConfirmSpy').should('be.calledOnce') cy.get('main').should('contain.text', testFoo.category) cy.clickToolbarButton('empty trash'); cy.wait('@cat_delete') cy.get('@winConfirmSpy').should('be.calledTwice') cy.get('#system-message-container').contains('Category deleted.').should('exist') ...If it is just a matter of setting a fixed value for the
'window:confirm'call, the following code will do the job.cy.on("window:confirm", (s) => { return true; });Conclusion
In this article you have seen basic theory and practical features of E2E testing with Cypress. I used the Joomla installation to demonstrate how to write different tests to ensure that a Joomla component on a website works as expected. I also showed how to customize the Cypress Test Runner in the cypress.json file and how to use customized Cypress commands. This was done using easy to follow examples.
I hope you enjoyed the tour through Cypress using Joomla as an example and that you were able to take away a lot of knowledge and inspiration for yourself.
Links
- https://magazine.joomla.org/all-issues/october-2022/off-to-cyprus-ehm-cypress-how-joomla-does-its-end-to-end-testing
- https://github.com/joomla/joomla-cms/pull/38422
- https://www.youtube.com/watch?v=26jL9EVI-98
- https://github.com/joomla/joomla-cms/pull/38422
- https://www.youtube.com/watch?v=26jL9EVI-98
- https://docs.cypress.io/faq/questions/using-cypress-faq
- https://learn.cypress.io/
By accepting you will be accessing a service provided by a third-party external to https://magazine.joomla.org/
Comments 1
Thanks very much. Helped me a lot to get things going.