
[ this article is part of a series - see part 1 here ]
4. Create, Update, Fetch and Delete Joomla Articles with the API
4.1. Create Joomla Articles with the API
4.1.1. Terminology
Some basic terminology first: When using the Joomla API
- Create =
post - Update =
patch - Fetch =
get
4.1.2. See the Articles Manager
This is a fresh website so I see that “No Articles have been created yet”

4.1.3. Prepare the POST script
Create your POST script on your website
- create a new file on your website (for example
api-post.phpat the root) - go to https://github.com/alexandreelise/Manual/blob/patch-1/docs/general-concept/webservices.md
- go to the “Using the PHP cURL Functions” section (because we want here an independent script so we don’t use the Joomla Framework version)
- copy the code for “Define some variables” and paste it in your file
- copy the code for “POST” and paste it at the end of your file
Customize your POST script on your website
- in your file adapt the variable
$urlwith your domain name. In my example:- from
$url = 'https://example.org/api/index.php/v1'; - to
$url = 'https://api.joomlacustomfields.org/api/index.php/v1';
- from
- and paste your Token. In my example:
- from
$token = ''; - to
$token = 'c2hhMjU2OjI3NDpmOGMyNGIyMmI4ZTI0YzhlN2VhMGI1YmI2MTk5ODdiODViZWIwYjBhMTkwYzYxMmZkMDEzYWUxNzg5MmE2YzNm';
- from

4.1.4. articletext vs introtext and fulltext
Good to know: when you Create an article
- instead of using (just like in the database of a Joomla website) the classical
introtextfor the text which comes before the potential READ MORE- and/or
fulltextfor the text which comes after the potential READ MORE
- you can use
articletextwhich is “smart” and will separate your text intointrotextandfulltextwhen detecting<hr id="system-readmore">
4.1.5. The 4 necessary fields
To create an article
- title (Joomla takes care automatically of the alias creation. Reminder: a given alias can only be assigned to 1 article)
- articletext (see explanation above)
- catid (the category ID. Example : une uncategorized which is available by default on every Joomla installation had ID 2)
- language (that you can set on when you want to assign an article to all* languages)
4.1.6. Execute your script
Simply
- open a new browser tab
- type the full url of your script
- press Enter to open that url
- the script is being excuted
- and finally the page displays some feedback
- this is only to reassure you that everything was fine
- as such, displaying anything is totally unnecessary
- with other words, you could simply comment or delete the line
echo $response;

4.1.7. Go back to or refresh the Articles Manager
Tadam you can see that the Article was indeed created!

4.2. Update Joomla Articles with the API
4.2.1. Prepare the PATCH script
The procedure is totally similar to the one of the previous script:
Create your PATCH script on your website
- create a new file on your website (for example
api-patch.phpat the root) - go to https://github.com/alexandreelise/Manual/blob/patch-1/docs/general-concept/webservices.md
- go to the “Using the PHP cURL Functions” section (because we want here an independent script so we don’t use the Joomla Framework version)
- copy the code for “Define some variables” and paste it in your file
- copy the code for “PATCH” and paste it at the end of your file
Customize your PATCH script on your website
- in your file adapt the variable
$urlwith your domain name. In my example:- from
$url = 'https://example.org/api/index.php/v1'; - to
$url = 'https://api.joomlacustomfields.org/api/index.php/v1';
- from
- and paste your Token. In my example:
- from
$token = ''; - to
$token = 'c2hhMjU2OjI3NDpmOGMyNGIyMmI4ZTI0YzhlN2VhMGI1YmI2MTk5ODdiODViZWIwYjBhMTkwYzYxMmZkMDEzYWUxNzg5MmE2YzNm';
- from

Good to know: when you Update an article
- the field
articletextdoes not work - you should use (just like in the database of a Joomla website)
introtextfor the text which comes before the potential READ MORE- and/or
fulltextfor the text which comes after the potential READ MORE
4.2.2. Execute your script
Simply execute your script as already explained above.

4.2.3. Go back to or refresh the Articles Manager
When opening the Article, we can indeed check that
- the Title has changed
- as well as the Introtext and Fulltext

4.3. Playing with Custom Fields
Adding a value to some Custom Field of an Article directly in the database using a query in PHPMyAdmin is not so obvious because it involves several Tables which are linked.
But as you will see, adding a value to some Custom Field of an Article via the Joomla API is super easy.
4.3.1. Create a Custom Field
In this example I create a Custom Field of Type “Text”
- its Title is “Temperature”
- its Name (meaning Alias) becomes then automatically “temperature” upon Saving (but I could of course type another Name like “temp” if I wanted)

4.3.2. Adapt the PATCH script
Now I need to edit my api-patch script as follows
- in the
$dataI add a new line'temperature' => '15 degrees Celcius' - (and I don’t forget to add
,at the end of the previous line)

4.3.3. Execute your script
Simply execute your script as already explained above.
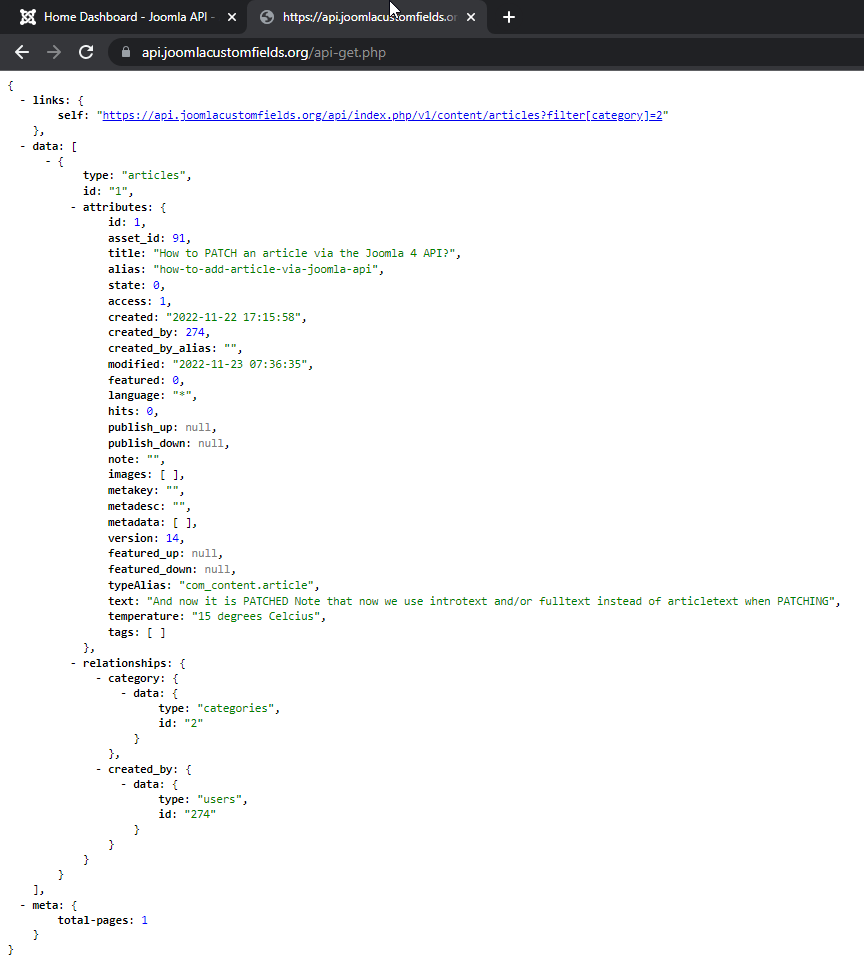
You already see on what is displayed that “temperature” is mentioned.

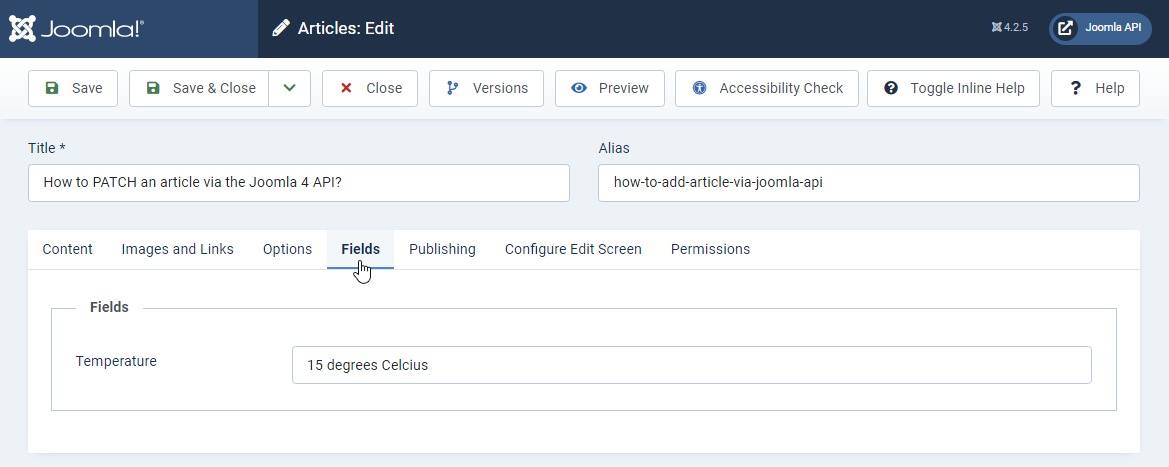
4.3.4. Go back to or refresh the Articles Manager
When opening the Article, we can indeed check that
- the Custom Field “temperature” has been filled in
4.4. Fetch Joomla Articles with the API
A good usecase for this script: an intranet or an app where one wants to display some news (articles) from your Joomla website
4.4.1. Prepare the GET script
Create your GET script on your website
- create a new file on your website (for example
api-get.phpat the root) - go to https://github.com/alexandreelise/Manual/blob/patch-1/docs/general-concept/webservices.md
- go to the “Using the PHP cURL Functions” section (because we want here an independent script so we don’t use the Joomla Framework version)
- copy the code for “Define some variables” and paste it in your file
- copy the code for “GET” and paste it at the end of your file
Customize your GET script on your website
- in your file adapt the variable
$urlwith your domain name. In my example:- from
$url = 'https://example.org/api/index.php/v1'; - to
$url = 'https://api.joomlacustomfields.org/api/index.php/v1';
- from
- and paste your Token. In my example:
- from
$token = ''; - to
$token = 'c2hhMjU2OjI3NDpmOGMyNGIyMmI4ZTI0YzhlN2VhMGI1YmI2MTk5ODdiODViZWIwYjBhMTkwYzYxMmZkMDEzYWUxNzg5MmE2YzNm';
- from

4.4.2. Bonus 1: select another Category
In this example, we suppose we want to get all articles from Category 2
Of course, you can easily change the ID of the Category you need by adapting the following line of code:
$categoryId = 2;
4.4.3. Bonus 2: only get Published Articles
What is you only want to get Articles which are Published.
In the database, you probably know that technically being
- Published means that “state” is 1
- Unpublished means that "state is 0
- Trashed means that “state” is –2
- Archived means that “state” is 2
So all we need to change in the script is to change
/content/articles?filter[category]=
into
/content/articles?filter[state]=1&filter[category]=
4.4.4. Execute the script
Simply execute your script as already explained above.
4.5. Delete Joomla Articles with the API
Create your DELETE script on your website
- create a new file on your website (for example
api-delete.phpat the root) - go to https://github.com/alexandreelise/Manual/blob/patch-1/docs/general-concept/webservices.md
- go to the “Using the PHP cURL Functions” section (because we want here an independent script so we don’t use the Joomla Framework version)
- copy the code for “Define some variables” and paste it in your file
- copy the code for “DELETE” and paste it at the end of your file
Customize your DELETE script on your website
- in your file adapt the variable
$urlwith your domain name. In my example:- from
$url = 'https://example.org/api/index.php/v1'; - to
$url = 'https://api.joomlacustomfields.org/api/index.php/v1';
- from
- and paste your Token. In my example:
- from
$token = ''; - to
$token = 'c2hhMjU2OjI3NDpmOGMyNGIyMmI4ZTI0YzhlN2VhMGI1YmI2MTk5ODdiODViZWIwYjBhMTkwYzYxMmZkMDEzYWUxNzg5MmE2YzNm';
- from
We don’t provide screenshots here. By now you know how it works!

Comments