
In the last magazine article: Guiding you through Guided Tours, we looked at guided tours (available in Joomla 4.3) and walked through their use. We stopped at the point of creating a guided tour as an administrator and as a developer.
Now we will finish that journey so you can build your own!
Now that you have been introduced to guided tours and have seen how they work, you may want to create one yourself.
Whether you are a consultant, a web designer, a web agency or a developer, you could take advantage of tours and offer a unique experience to your client or users.
Creating a tour is easy
First, you need to decide what the tour will be about and where you would like to make the tour available.
Let's say you want to create a tour that guides a new administrator through the Joomla dashboard so that this administrator gets a 'feel' of what he can do in the Joomla console.
Planning the tour
Log into the administration console with only administrator access so that you are aware of what the administrator will see on the dashboard.
Note that you could create an access level for administrators that are new to Joomla so that only those with that access level will see the tour.
Your tour will need:
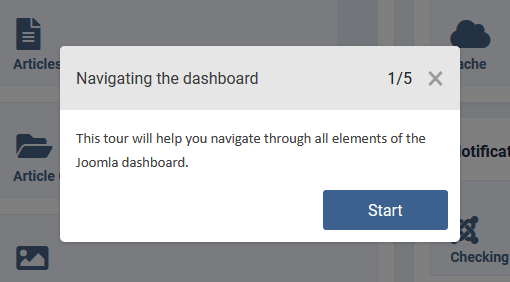
- Title of the tour: Navigating the dashboard.
- Description of the tour: This tour will help you navigate through all elements of the Joomla dashboard.
- Url of the tour: administrator/index.php
The tour will have 4 steps:
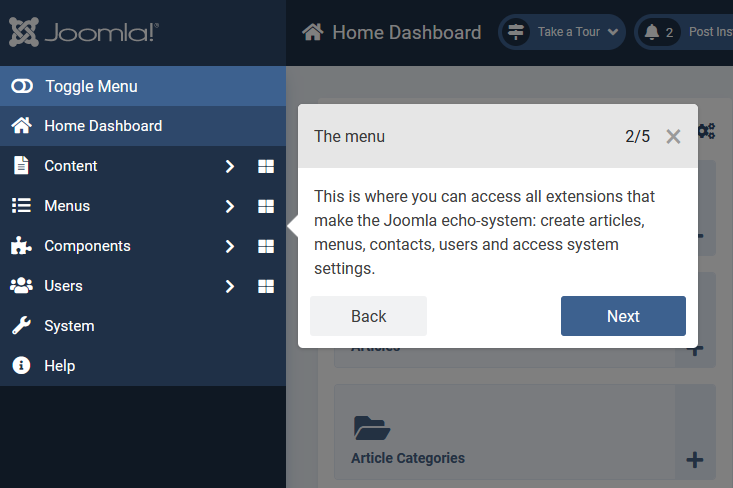
- Step 1: highlight the menu
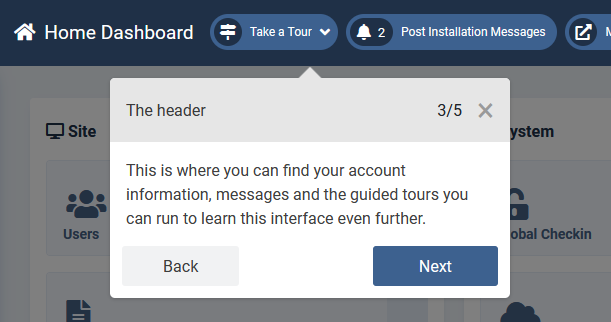
- Step 2: highlight the header
- Step 3: highlight the quickicons
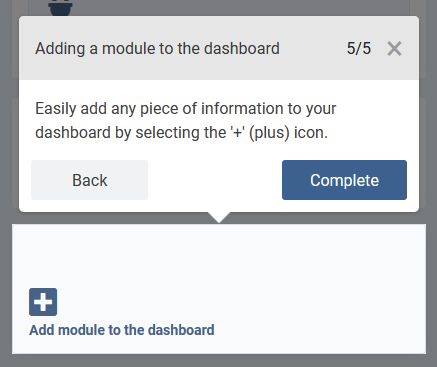
- Step 4: highlight the possible addition of modules on the page
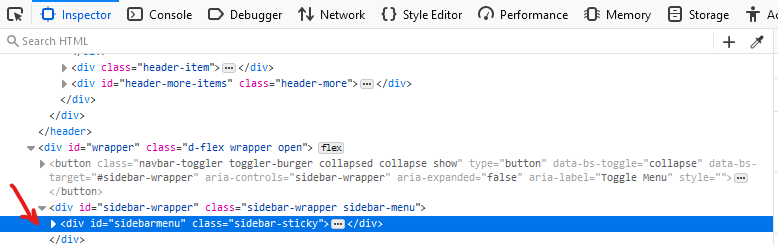
As we want to highlight specific areas of the dashboard, we need to find out what elements we can target. This is where the browser will be of help: use the 'inspection developer tool' to gather information about how the page is ‘constructed’.
For instance, for step 1, we can target the element with the id 'sidebarmenu'.
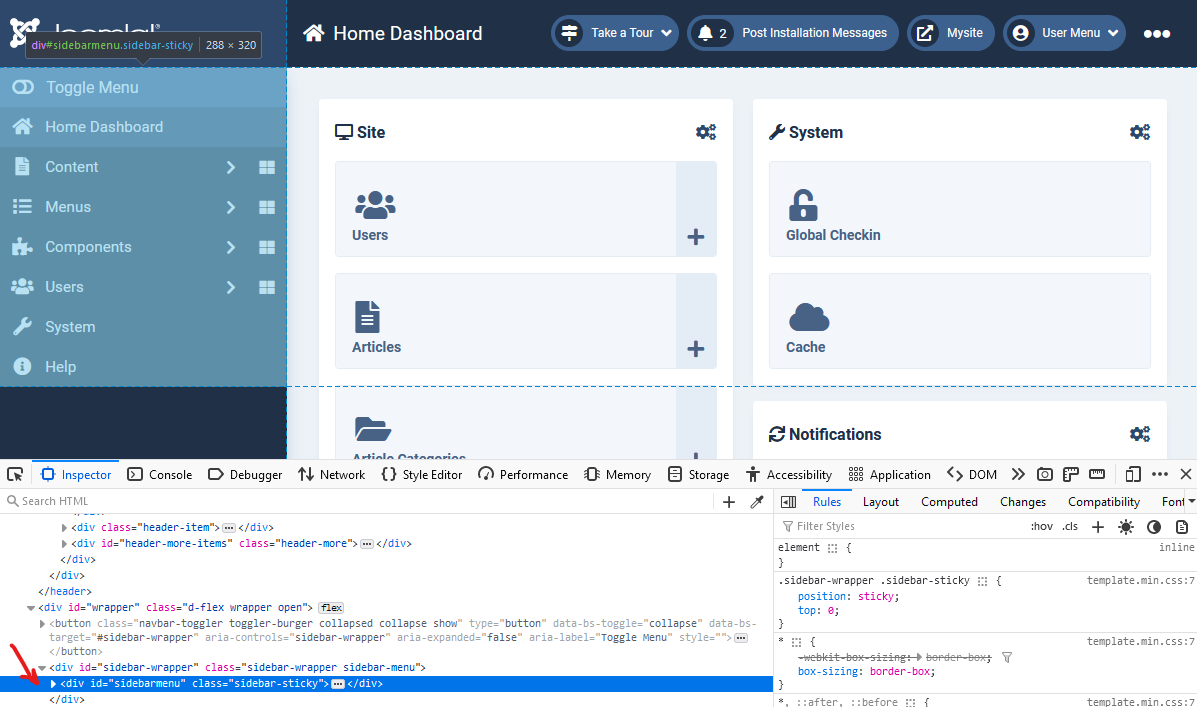
In general, it's best to target an id rather than a class. Ids are unique to a page, but a class can be found multiple times on a page.
Note that the guided tour script will select the first class found if multiple occurrences of the same class exist.
Let's go through the same process for the other steps.
Step 2: We can use the id 'header'
Step 3: Let's target the first of all the elements having class 'module-wrapper'
Step 4: Let's target the last 'module-wrapper', which is always the one containing 'Add module to the dashboard'. In this case, we will use '.module-wrapper:last-child'
We have enough to create the tour. Let's go back to the Joomla administrator console with our own credentials.
Creating the tour
Go to System -> Manage -> Guided Tours
Create a new tour.

The tour now appears in the list of tours.
Creating steps for the tour
To create steps, let's select the button that highlights how many steps are part of the tour.

Let's add our first step.
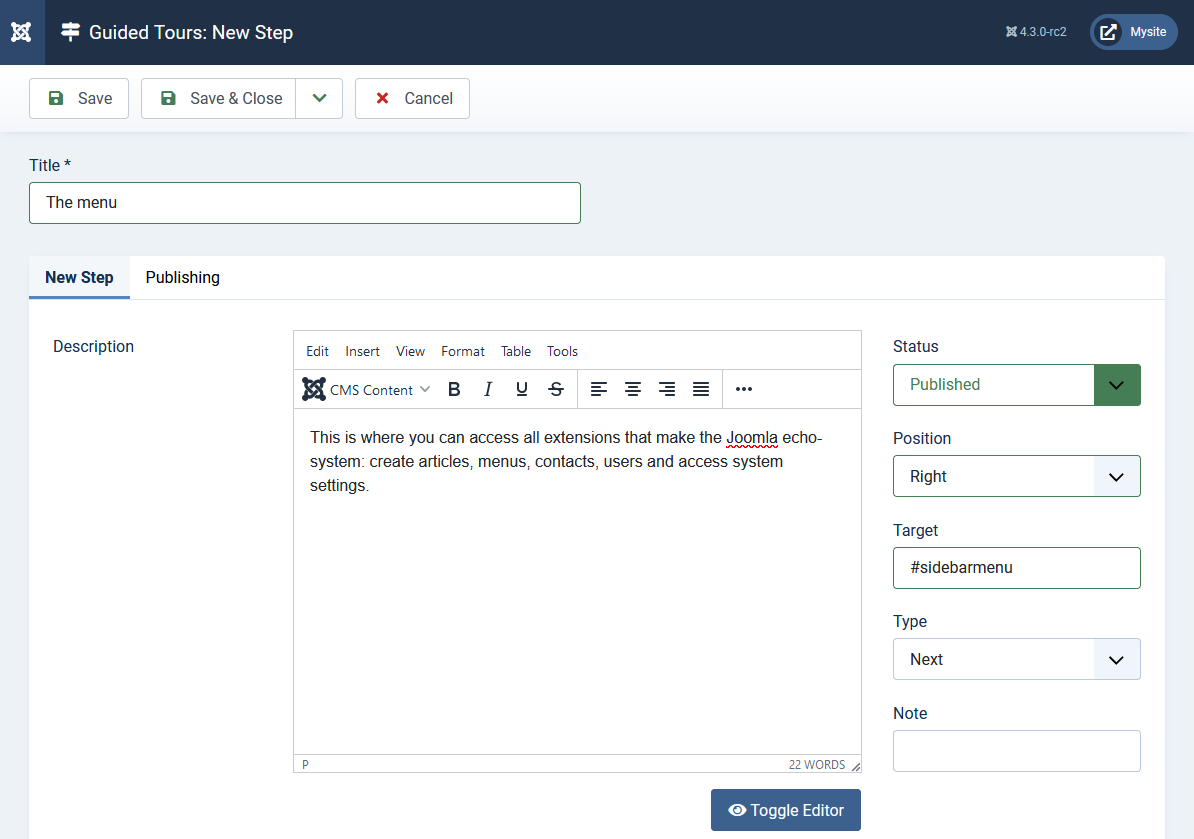
Step 1: The menu
The menu is on the left of the screen for our users, so we will position the tour popup on the right of it.
The element targeted is '#sidebarmenu'. Remember, 'sidebarmenu' is an id, so its CSS representation starts with a '#'.
As you can see, the steps use the CSS selector syntax.
The type of step is 'Next' as we do not require any interaction from the user other than going to the next step of the tour.
Step 2: The header
The popup will be positioned below the header, so we select 'Bottom' as a position.
The target is '#header' since the id of the header is 'header'.
Once again, the type of the step is 'Next'.
Step 3: the panel quick icons
The popup will be positioned to the right of the targeted element.
'.module-wrapper' is used to target the first 'module-wrapper' of the page (no need to use something like '.module-wrapper:first-child').
Step 4: Adding a module to the dashboard
The popup will be positioned at the top of its target.
We use target '.module-wrapper:last-child .card' to get to the last of the panels, which is the one allowing users to add a module to the dashboard.
The additional 'card' class allows us to specifically target the panel without the extra margin required for the card's shadow.
Testing the tour
It is now time to test our tour. We log in as an administrator to see the available tour that was just created.

You can create more complex tours, of course, with page redirection, and user interaction.
You can find good examples already within the existing tours.
Multilingual tours
For multilingual websites, you have 2 options when creating tours.
- Either duplicate the tour you just created, change its language and translate the titles and descriptions,
- Or use language keys in place of titles and descriptions.
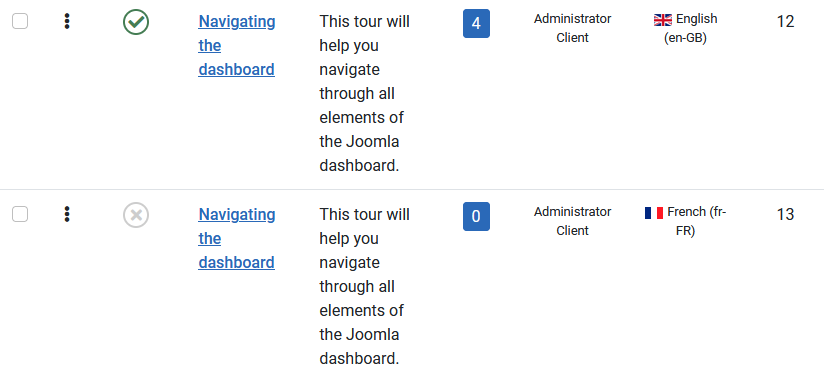
Duplicating a tour
This option will duplicate the tour and its associated steps (tours and steps are unpublished when duplicated).
You can then go through each tour, select the preferred language and translate the tours and steps.
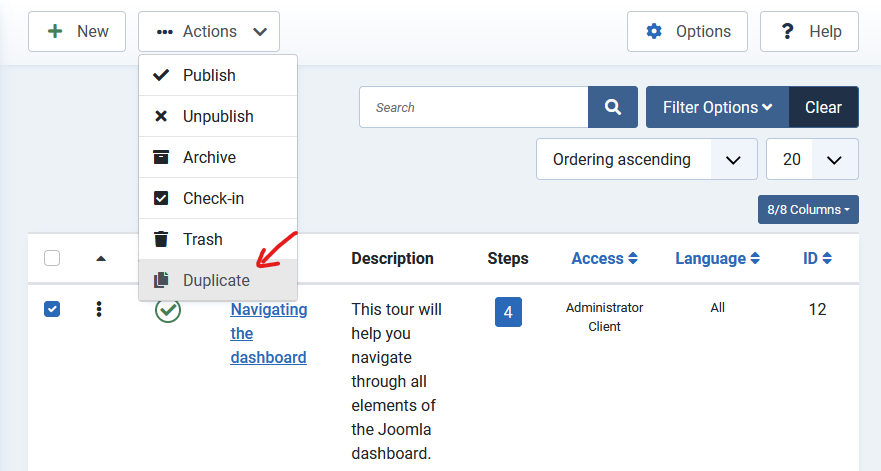
You will end up with a new unpublished tour with unpublished steps.
Using language keys in a tour
This can be handy if you are a developer and need to cover multiple languages for your extension.
Create language keys for all titles and descriptions, the same way core tours are created.
You just need to make sure GUIDEDTOUR is included in the language key to be recognized as a key for the guided tours.
Provide users with the translations, as you would for any other language key for your extension.
If you are not creating a tour for an extension but still need multilingual tours, just create language keys through language overrides.
Exporting tours
At this time there is no specific tool for exporting tours.
However, packaging tours should be simple if you know your way around databases.
Tours are located in 2 database tables: _guidedtours and _guidedtour_steps.
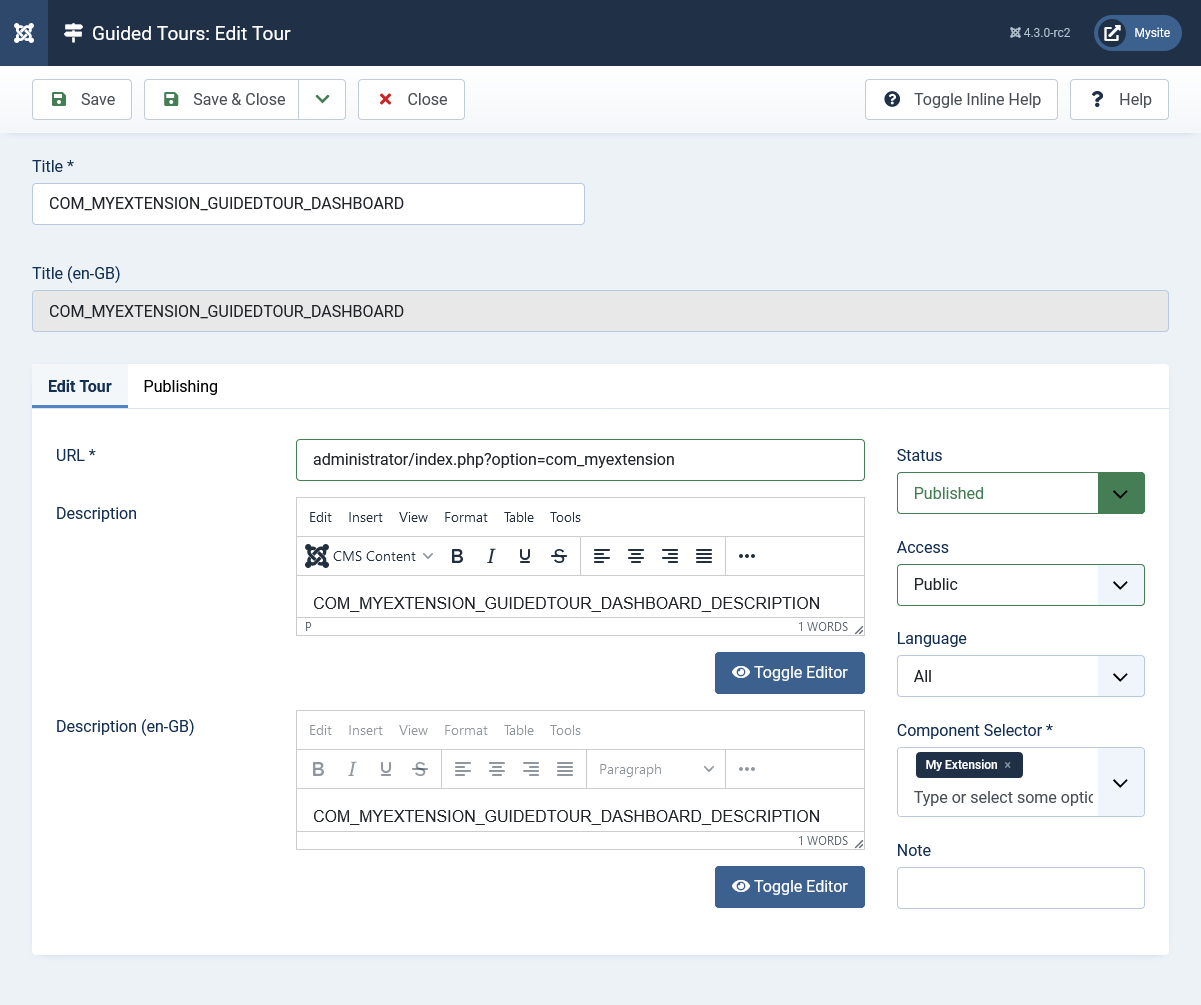
Export the data you have created (via a tool like PhpMyAdmin for instance) and use it in your extension’s install. This will have to be done programmatically in order to gather specific values for the tours.
This sample code would import a tour created for an extension called ‘My Extension’.
   $db = Factory::getDbo();
   $date = Factory::getDate()->toSql();
   $user = Factory::getApplication()->getIdentity();

   // Insert a tour
   $query = $db->getQuery(true);

   $columns = [
       'title',
       'description',
       'extensions',
       'url',
       'created',
       'created_by',
       'modified',
       'modified_by',
       'published',
       'language',
       'ordering',
       'access',
   ];

   $values = [
       'COM_MYEXTENSION_GUIDEDTOUR_DASHBOARD',
       'COM_MYEXTENSION_GUIDEDTOUR_DASHBOARD_DESCRIPTION',
       '["com_myextension"]',
       'administrator/index.php?option=com_myextension',
       $date,
       $user->id,
       $date,
       $user->id,
       1,
       '*',
       1,
       1,
   ];

   $dataTypes = [
       ParameterType::STRING,
       ParameterType::STRING,
       ParameterType::STRING,
       ParameterType::STRING,
       ParameterType::STRING,
       ParameterType::INTEGER,
       ParameterType::STRING,
       ParameterType::INTEGER,
       ParameterType::INTEGER,
       ParameterType::STRING,
       ParameterType::INTEGER,
       ParameterType::INTEGER,
   ];

   $query->insert($db->quoteName('#__guidedtours'), 'id');
   $query->columns($db->quoteName($columns));
   $query->values(implode(',', $query->bindArray($values, $dataTypes)));

   $db->setQuery($query);

   try {

    $result = $db->execute();
    if ($result) {
        $tourId = $db->insertid();

        // Insert steps for the tour

        $query->clear();

        $columns = [
            'tour_id',
            'title',
            'description',
            'position',
            'target',
            'type',
            'interactive_type',
            'url',
            'created',
            'created_by',
            'modified',
            'modified_by',
            'published',
            'language',
            'ordering',
        ];

        $step_values = [];

        $step_values[] = [
            $tourId,
            'COM_MYEXTENSION_GUIDEDTOUR_DASHBOARD_STEP1',
            'COM_MYEXTENSION_GUIDEDTOUR_DASHBOARD_STEP1_DESCRIPTION',
            'right',
            '#sidebarmenu',
            0,
            1,
            '',
            $date,
            $user->id,
            $date,
            $user->id,
            1,
            '*',
            1,
        ];

        // $step_values[] = [ ... ];
        // ...

        $dataTypes = [
            ParameterType::INTEGER,
            ParameterType::STRING,
            ParameterType::STRING,
            ParameterType::STRING,
            ParameterType::STRING,
            ParameterType::INTEGER,
            ParameterType::INTEGER,
            ParameterType::STRING,
            ParameterType::STRING,
            ParameterType::INTEGER,
            ParameterType::STRING,
            ParameterType::INTEGER,
            ParameterType::INTEGER,
            ParameterType::STRING,
            ParameterType::INTEGER,
        ];

        $query->insert($db->quoteName('#__guidedtour_steps'), 'id');
        $query->columns($db->quoteName($columns));

        foreach ($step_values as $values) {
            $query->values(implode(',', $query->bindArray($values, $dataTypes)));
        }

        $db->setQuery($query);

        $result = $db->execute();
       }

   } catch (ExecutionFailureException $e) {
       Factory::getApplication()->enqueueMessage($e->getQuery());
   }
What's next?
There are improvements coming in the next few months and we are only just ‘scratching the surface’ of all the new possibilities that are offered to us.
- Core tours will be improved, be more ‘verbose’ and useful,
- More tours will be added out of the box, like a Dashboard tour for instance,
- Tours could get the option to start upon user login,
- Tours could be created for the frontend…
What would you like tours to be able to do? What improvements would you like to see?
Your feedback will help us shape the future of guided tours, message in the comments or email @
Comments