
A role represents the permissions and access needed to do a task. Once roles have been set-up, one can intuitively assign, aggregate, transfer, and share these roles among CMS users. Here is a straight-forward approach to implementing roles in Joomla.
In a previous article I made a case for a role-based approach to access control when the website will be managed by multiple people. Roles are intuitive to use, role assignment corresponds to the varied and ever-changing responsibilities of staff, and well-designed roles can grant a user just the right amount of access and permissions needed and no more.
The role-based approach is a departure from the level-based approach we used in 1.5 and the default ACL configuration in 2.5. Consider the traditional groups of author->editor->publisher. Unless business rules require the constraint that an editor should always be an author and a publisher should always be an editor, there is no need to have these inherit as they do. Instead, each could share Public as its parent, enabling us to assign a user to any configuration of these three independent roles. Who says a publisher must also be an author!
A role-based approach crosses lines that a level-based perspective presumes to be a boundary and that 2.5 has erased.
As we implement roles, we freely create new groups and access levels, establish a relatively flat hierarchy of our new groups, and assign permissions sparsely. Within a level-based framework these practices seem wrong. For inspiration we need to look beyond the traditional ACL configuration. Here is an approach to implementing roles in Joomla.
Identify the roles your client needs
Iidentify CMS responsibilities that are apt to be shared or transferred between users. A good starting point is to focus on each component and consider if there should be a role just for it. This might be overly-simplistic, but because roles are often tied to a single component, it is a good place to start. And of course, sometimes a role will be responsible for multiple components or just a few parts of a complex component. When you do identify a role, define it in terms and scope that is understood by those who will be managing the site and its content.
Create a group for each role
We will use Joomla’s “user group” to represent a role. Each role is represented by its own group. If you identified twelve roles, you will be adding twelve new user groups. Each group will confer a set of permissions and access that is unique to that role – nothing more, nothing less. The name you use for the group will be the role name that the client will see when assigning users to roles, so chose an intuitive name, even it if requires multiple words.
Flatten the group hierarchy
Most roles will be sibling to the other roles and the hierarchy will be shallow. This is different from the group inheritance we've seen in 1.5 and 2.5, where sibling groups are rare and linear inheritance is common. in contrast, most role-based groups will share the same parent because most roles are independent of the other roles, and it should be possible to assign a user to any combination of roles without overlap or conflicts.

Assume that role-based groups will be siblings to each other, but be mindful that two common reasons argue for an extra level of inheritance: (1) When multiple groups share some set of permissions or some access level, it makes sense to create a parent group that represents these shared permissions or access. (2) When a role should include all the permissions and access of another role and then expand upon those, that expanded role should inherit from its base role.
Typically several roles will require backend access, and this is a good reason to create a parent group that allows Admin Login. All backend roles will share this as their parent. A group that confers backend access requires attention to two settings. First, go to Global Configurations and set the permissions for this group to allow Admin Login. Second, if you want the admin menu to show to these users (for some sites you might not), you need to add this new group to the access level Special. (Why? The admin menu is set to the access level Special, and you are responsible for adding any group you create to the appropriate access levels.)
Roles that do not require backend access can share Public or Registered as their parent, or if you find it more intuitive, you can create a group called Frontend Roles for the sole purpose of gathering all frontend roles under a single parent group.

Assign permissions per role
Typically a role will be limited to just one component. For each role-based group, go to its associated component(s) and grant the needed permissions only to this role-based group. It is not uncommon that a component grants permission only to Super, Administrator, and one role-based group. In fact, it is reasonable to withdraw permissions previously granted to Administrator (and even Super) leaving the role-based group as the only group conferring these permissions.
Create role-based access levels
It is helpful here to understand how access levels fit into the ACL. Mechanically, an access level is nothing more than some custom grouping of user groups. In application, the access level represents the criteria that a user much satisfy to determine whether or not that user is a member of the access level (and thus deserves access). Modules, menu items, plugins, categories, and even each item itself must be assigned to an access level. This assignment is virtually a rule assignment that instructs joomla as to whether or not if will display the item or process the plugin – based indirectly upon a user's group assignment.
 Arguably, the poorly named "access level" would be better named "access rule." Although the default set of access levels (public, registered, special) are set up to represent three tiers representing “levels,” in 2.5 there is nothing inherent to access levels that confer levels. An access level declares only a set of groups (in any combination and with no awareness to levels).
We will use this realization to our advantage. If any part of the site (category, admin module, menu item, etc.) should be accessible only to those assigned to this role, then we create a role-based access level that includes only this group. For now we set this up as a one-to-one relationship so that this access level will provide access only to those who have been assigned this role. If a user is not assigned to this role, they don't get access to it. Keep in mind that a role-based access level is not always needed, but if you have any editing options that are to be displayed only if the user is assigned to a particular role, then you will need a corresponding access level.
Naming conventions help us manage what can become a non-trivial list. I prefix every role-based access level with a tilde (~). Since access levels are listed alphabetically, this helps to visually bundle the role-based access levels into one grouping and to separate them from the traditional set (public,registered, special).
Refactor your ACL
“Refactoring” is the practice of taking verbose or needlessly complex things and simplifying them. In math, we refactor 15/25 into 3/5. In programming we take verbose code and simplify it to do the same thing but with fewer lines and in ways that makes the code easier to maintain.
Here, we evaluate the groups and access levels we created and look for reasonable ways to simplify. Perhaps a set of groups calls for a new group to be a shared parent for sharing permissions or an access level. Perhaps some role-based access levels are not really needed, or there is a need to consolidate one or more into a single access level. If everything is working fine, you don’t need to refactor, but refactoring your ACL could lead to a configuration that is more intuitive.
Admin modules
One of the big benefits of a role-based approach is that those who manage the site through the backend can see a dashboard that displays only what they need to have access to. The admin menu should not show what the user does not have permission to use. A powerful way to customize the backend is to create admin modules, one per role, and assign each of the modules to the respective role-based access level. Each of these modules can contain information or quick-links that are to be shown only for someone assigned to that access level. The backend will display only those modules corresponding to a user’s assigned roles. This is illustrated below.
Assigning users to roles
 It is our responsibility, as site integrators, to have created and configured roles that correspond to the business understanding of each role. If we have done this well, then what we hand to our client is a very intuitive system for managing role assignments. It is a simple checklist of roles, each intuitively named and conferring the permissions one would expect. It is as simple as that.
What might not be immediately obvious is the need for a "user management" role. This special role grants the ability to create users, adjust settings, and assign role-based groups. True to the role-based philosophy, this role allows us to grant someone permissions to manage users and without having to elevate them to administrator. Don't forget to create this role.
Summary
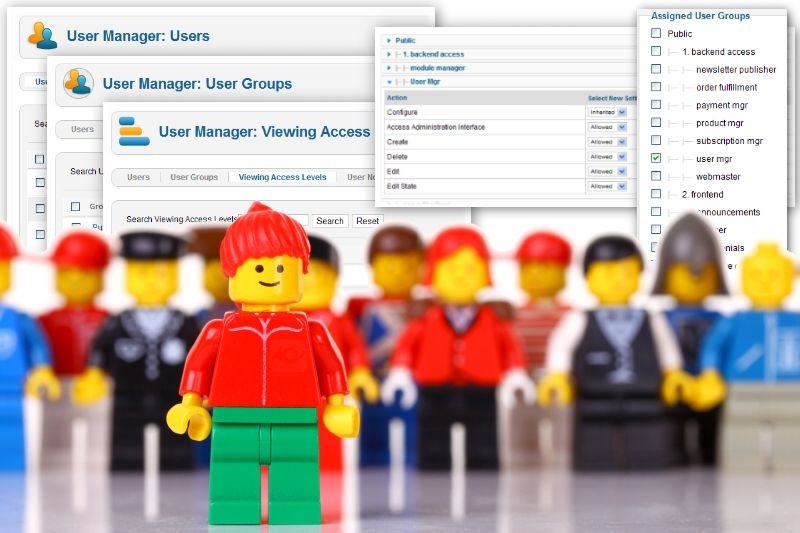
To reinforce this straight-forward approach, here are the simple steps to creating the role user manager.
- Create a new group. Call it "user management." Its parent should be a group that grants backend access. If you don't have such a group, create that parent group and give that parent permissions for administrator login and add it to the access level Special.
- Assign the needed permissions. From the backend go to the User Manager screen and select options. Within the section user management (and only within this section) allow all the permissions except "configure." Do not set any other permission.
- Access Levels. In this case we do not need a role-based access level because the main menu will automaticaly show it to those who have permission to access it. however, if you want to provide some admin modules that will display only for user managers, then you will need to create that role-based access level for this role.
- Assign a user to just this role. Then test your settings. Login as this user to the backend and observe the simplicity we have created for user management.
This article has provided a quick approach to setting up roles in Joomla. It is not hard, but implementing a role-based ACL does require a new perspective. Are you up to it?
Comments