Review: Component Creator for Joomla!

This is about a tool which has gained a lot of attention in the Joomla community over the last few months.
Component Creator is a tool that generates fully functional, ready to install, custom Joomla components in minutes. It takes all the tedious work out of Joomla development, giving you more time to focus on the stuff that matters.
Promising words. Don’t believe me? Ok, let me prove it.
Before you Start
--> Before you start building a component there are some things you need to know. Although this tool can be used by users who are not familiar with Joomla development, it is recommended to have a basic understanding of Joomla component development to understand how the tool works. Non experienced users, or users with little Joomla development experience might want to take a look at these helpful tutorials:
- Development of a Component Model-View-Controller (MVC) for Joomla! 2.5
- Component for Joomla! 3: Setting the Stage
- Component for Joomla! 3: Starting the development
- Component for Joomla! 3: Features
--> Something to keep in mind before starting to use this tool is to make sure you know what type of component you want to create. As the previous article, "Setting the Stage" explains, things to consider are: what characteristics it (the component) should have and what main functions it fulfills. Also, in this article we will use some links referencing the Wiki of this tool as there are some good instructions in it.
--> The opinions, suggestions or critiques on this article are personal and reflect the opinion of the reviewer.
--> This review is about the non-commercial version of the tool. It differs from the commercial version in that it only allows creation of a single table in your component and the "SQL Import" tool is not available.
Creating the Component: General Information
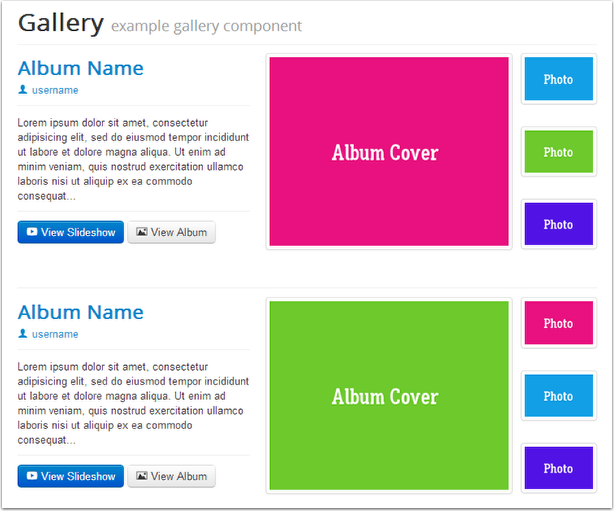
In this article we are going to build a component with the main purpose of creating a photo gallery for Joomla 3. You may think it difficult or even impossible to easily create such a photo gallery but in this 'real example,' I'll show you how.
The following screenshot is what our Gallery will look like in the end.
Step 1:
The first thing you need to do in order to use the Component Creator is to create an account. Once created you will see the following screen:
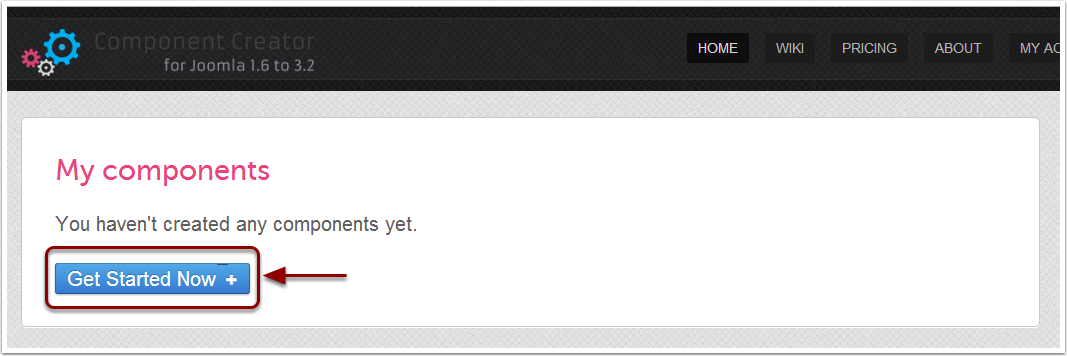
This screen will normally show a list of components that you have created but as you have not created any yet - it is empty.
To start creating a component go to the button "Start now" as indicated on the image above. Once clicked you will see the following screen.
To highlight some important things we have split the screenshot into two images:
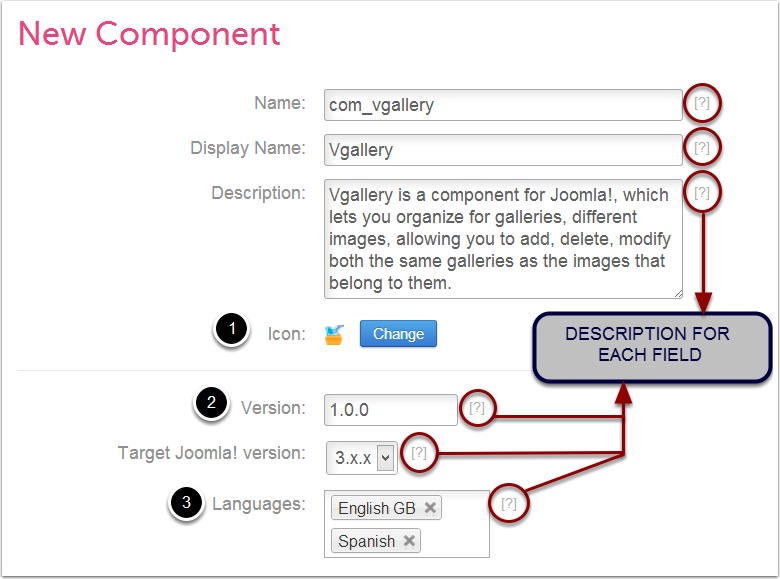
As you can see in the above picture all the fields are already filled out. This makes it easier to explain the use of the fields. Please note that you will find them blank or filled with the default values.
First I would like to highlight that each field has helpful text to the right of it. This is a description of its functionality, or the way of using it. These can be seen in the picture above, highlighted by red circles. So when in doubt, these descriptions should help. Here are some notes about fields that I think are important.
Follow the sequence indicated by the numbers in the above image:
- Choose an icon that appears when you click on "Components" in the administration of Joomla (next to the name of the component). Here you have two options: choose a default icon or upload a custom icon. The custom menu icon needs to be .PNG-file within a specified size.
- Choose which version number your component should use. In general, three values indicate different extension updates, but you can use the one that you consider appropriate.
- Here you can add languages in which you want your component displayed. For a multilingual component the description should always be in English. Adding a language here will add the corresponding language files in the file structure. Later on you can translate all fields needed to make it fully multilanguage. This feature is very uncommon in most extensions. So there is no doubt that this will make your extension much more accessible.
Now we have covered all of the component’s settings.
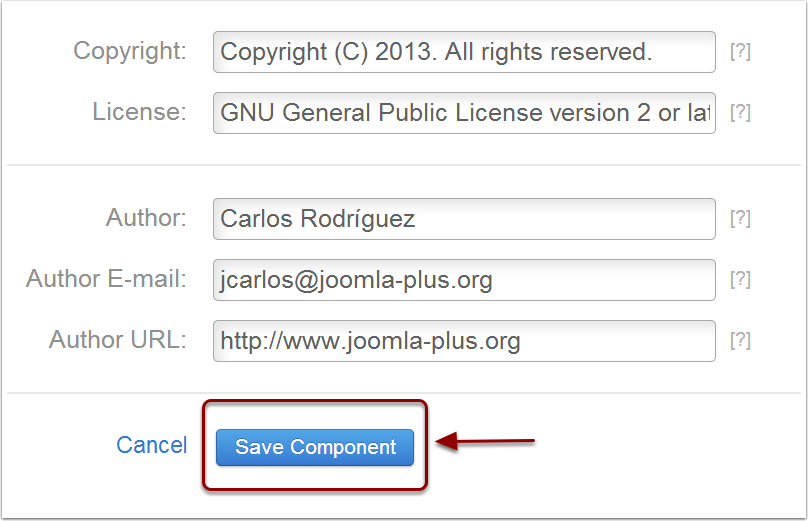
The data inserted into this second image (above) is not essential, but if you want to fill it in refer to the (?) descriptions on the right next to the fields.
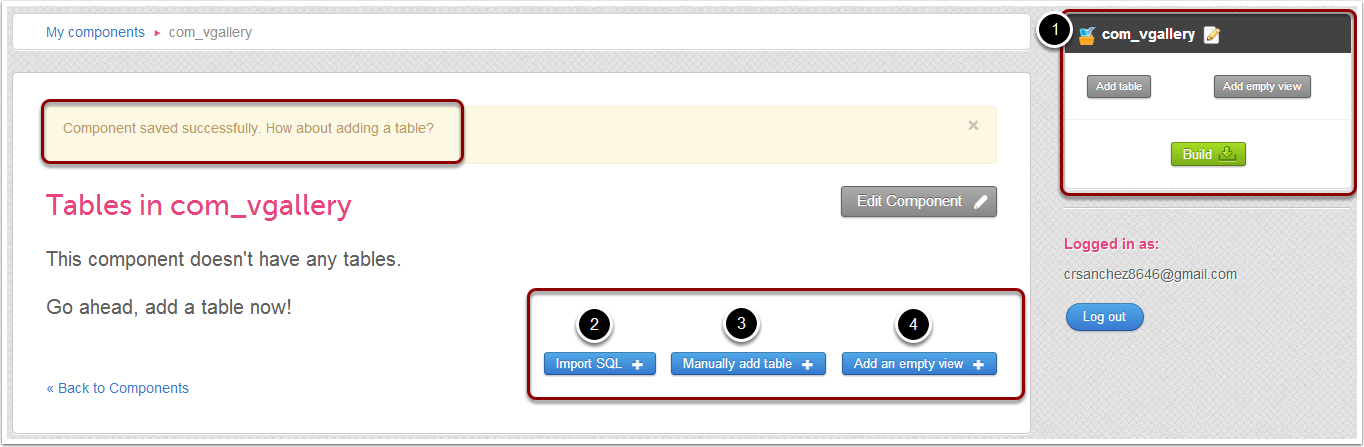
Creating the Component: Generate Tables
Once the fields have been completed, press the button "Save Component" to start creating the component. You will then be directed to a screen like the following one. It tells you that input data has been saved:
 Create your component (Click to enlarge image)
In this screen display you have everything you need to create your component. Work through the instructions according to the number in the above image:
- On the right sidebar, you find all the information related to the structure of our component. All tables and fields that are created are shown here. After we add a table this area will become clearer.
- "Import SQL" is a really useful tool. Assuming you have the .sql file of your tables already created you can import a component along with its different tables and fields. This saves the whole process of creating it manually. Even for a small component , using the SQL importer is still useful. Please remember this option is only available for users with a premium account.
- This option is the one that will enable you to create our tables manually. We will use this option during this review.
- This option is to add an empty view to the component. The views are from the MVC pattern. You can get more information about views in a component here. Being able to Add an empty view to the component can sometimes make sense. The wiki explains why.
Now to create the table, click "Manually add table". This takes us to the following screenshot. We have split the screenshot into two images so we can highlight some important features:
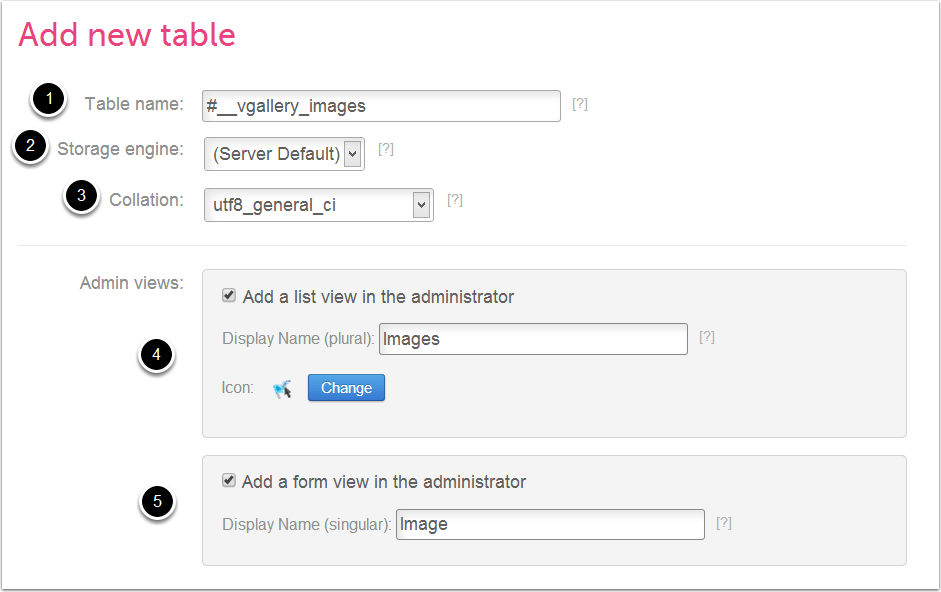
The numbers in the picture indicate:
- The name of the table that will be created from our database when the component is installed.
- This option is best left as the default, especially if you are not well versed in these matters.
- Same as in no. 2 , leave as the default.
- "Admin Views" refers to the administration side of the component. Here we have two views: the "list view" which will generate a list of items in admin. and the “form view” which permits the adding or editing of new items into our component from the back-end.
If using "Article Manager" in Joomla as an example, the view where you find a list of articles created in Joomla is the "list view in the administrator" The view where you edit an article is the "form view in the administrator".
After we mark the check box where it says "Add a list view in the administrator" our component will show a list of the images of the different galleries in the back-end.
Using the same example as before, The field "Display Name" is the name that will show in the administration view. On the items list view on the left there is a sub-menu that lists “Articles, Categories and Featured. These are the names we want to appear in that sub menu. For our component, we write "Images" as this will show the pictures in the component.
For multilanguage components remember we should write these terms in English.
The icon that represents the view could remain as the default or we may choose to upload a custom one as we did in our component configuration. - This view allows us to edit or create an article as explained in point 4. Our sample shows the view to upload or access an image of one of the galleries, and to edit your details.
The "Display Name" has the same functionality as explained on 4 above.
At this point only part of the table has been configured. The image above contains sample data for each field and their settings (1 through 5) and all refer to the administration side of the site. But we can also add or edit the front-end, the public side of the site. The following image shows us how:
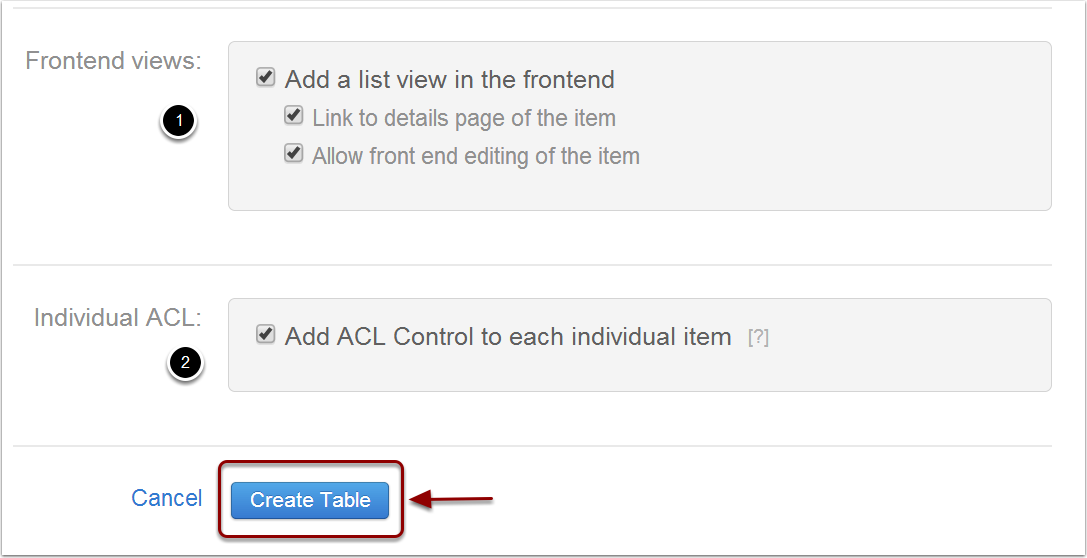
The numbers in the picture indicate:
- The first checkbox is similar to the administration side settings but for the front-end. By checking it, our sample will list the different galleries in our component. The second box gives the ability to access one of these galleries and see the images in the table as, for example, when we give the option to list categories of items in our regular Joomla sites.
The third box allows the front-end editing of the item. - This part is very interesting. We can use the potential of Joomla ACL (Access Control List) with only a click. By checking this box we will see the different CRUD permissions at the bottom of the edited view of every item (Form View).
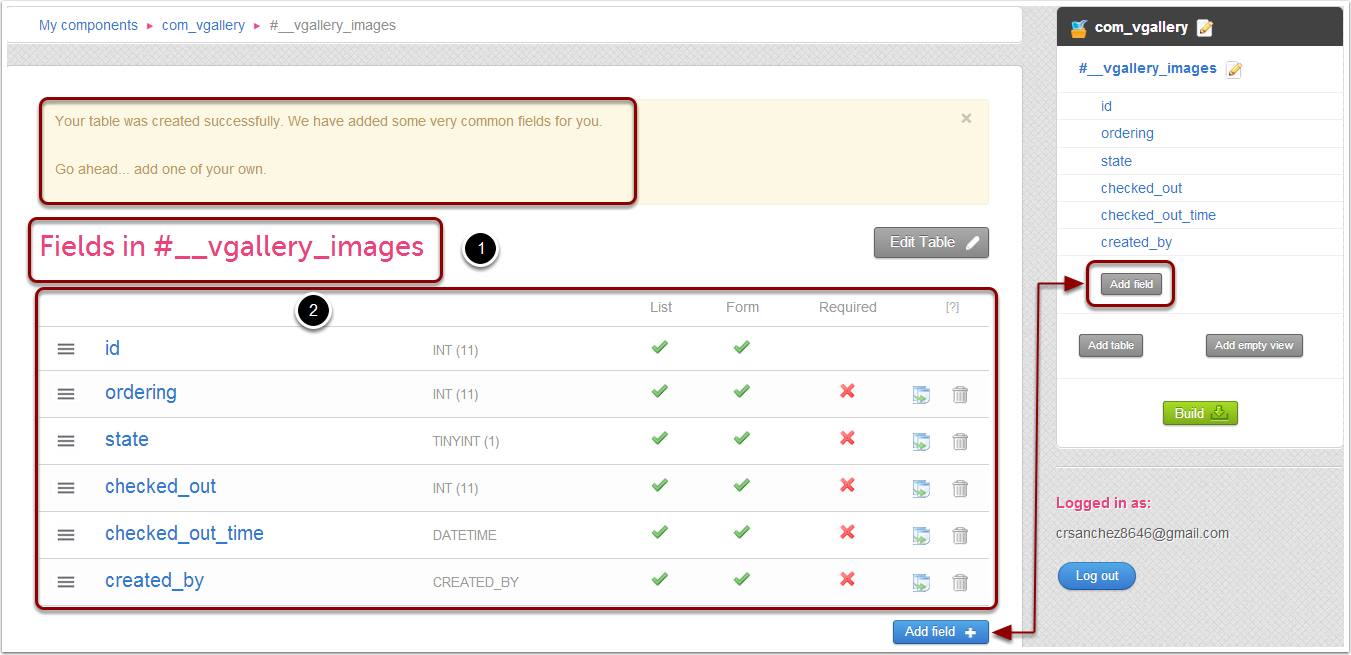
Once these options are set our table is ready to be generated. So we click "Create Table" to add the table to the component and we get a screen indicating that the table has been successfully added (see screenshot below):
 Add fields (Click to enlarge image)
Here we see the list of all the fields in the table. Using the numbers as a guide we have:
- The name that will appear in our database as the table name. Remember that "# __" is replaced by the prefix of your database.
- These fields are recommended ‘by default’ but they are not mandatory. These listed fields or values are the ones that the table is going to contain. The tool is very flexible in defining the fields as we can choose what fields we need, which of them are to be shown and many more options. We will talk more about this later.
Remember those default fields may be removed or edited with ease. In our example we have used the fields listed above and left them with their default settings.
Creating the Component: Creating New Fields
To create a new field for our table we just click on "Add Field" and we will be sent to the next screen, which, for convenience, is divided into two screenshots:
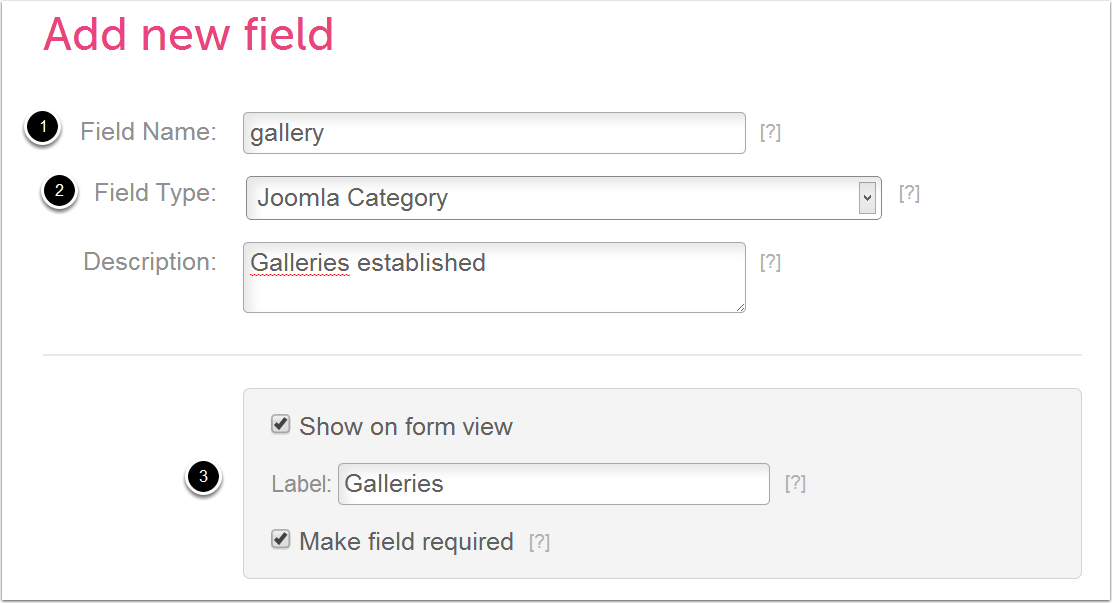
Maybe this is the most challenging but unique part of this tool: there are many different fields types and each one has many ways of being configured. The tool is so good it shows you all types of Joomla fields, plus other special fields. For a better understanding and description of each, visit the wiki. There are too many to list them all in this review. However if you do have any concerns please do not hesitate to leave us a comment and we will try to resolve them for you.
The numbers in the above image indicate:
- The field name identifying a column on the component's database table. In our example, the field is names, "gallery".
- For the field types you need to stop and think about the purpose of the field. In our "gallery" example, the field acts as a category for Joomla articles. Since Joomla articles always belong to a category, an image (in our component) must always belong to a gallery.
As galleries work as a category (grouping similar items) our ideal field will be the one on the picture “Joomla category”. Careful, this will not be a category listed in the Joomla Article Manager. Though you will have the same visual interface you have for categories in the Article Manager, here these "categories" or galleries will be associated with the component. When you enter the component you will see a sub-menu on the left that will list our created “Items - Images” as well as the "Categories - Galleries". There you will manage these categories, similar to using the Article Manager. - Here we choose the field label for the form view and whether or not in will appear. Think about whether you need this field completed or not. For example, an article should always have a title so the field in that case would be mandatory and if it is not filled in will display an error. Remember, when in doubt see the field description.
Next we deal with more ‘field’ view options:
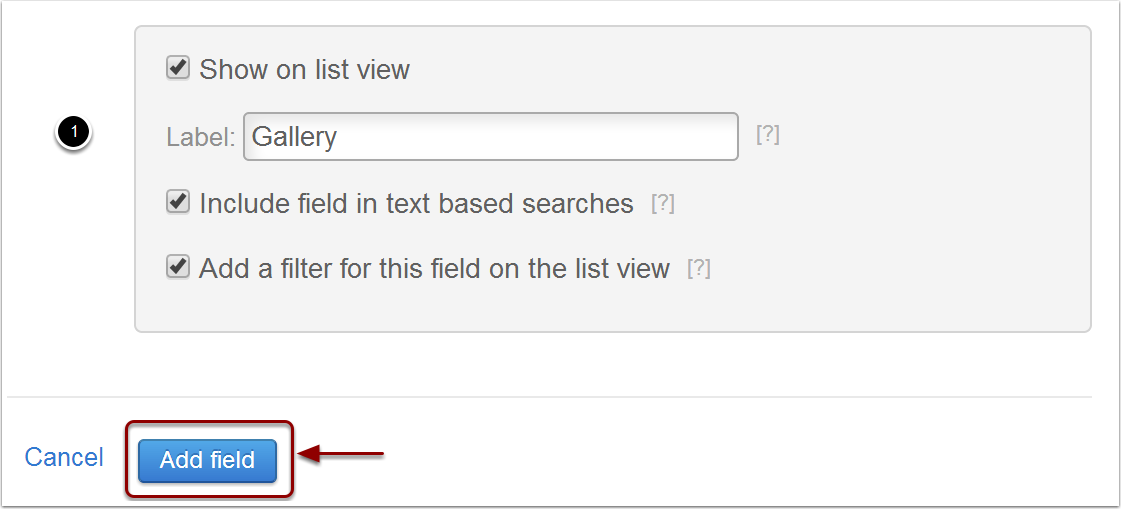
- This view will be familiar. Here you need to decide if this field appears in the list view and to give it a name. The other two boxes are to provide search options on that list in case it has a large amount of items.
When every parameter is completed to our satisfaction, we click on "Add field" to generate the field. We will get the following confirmation:
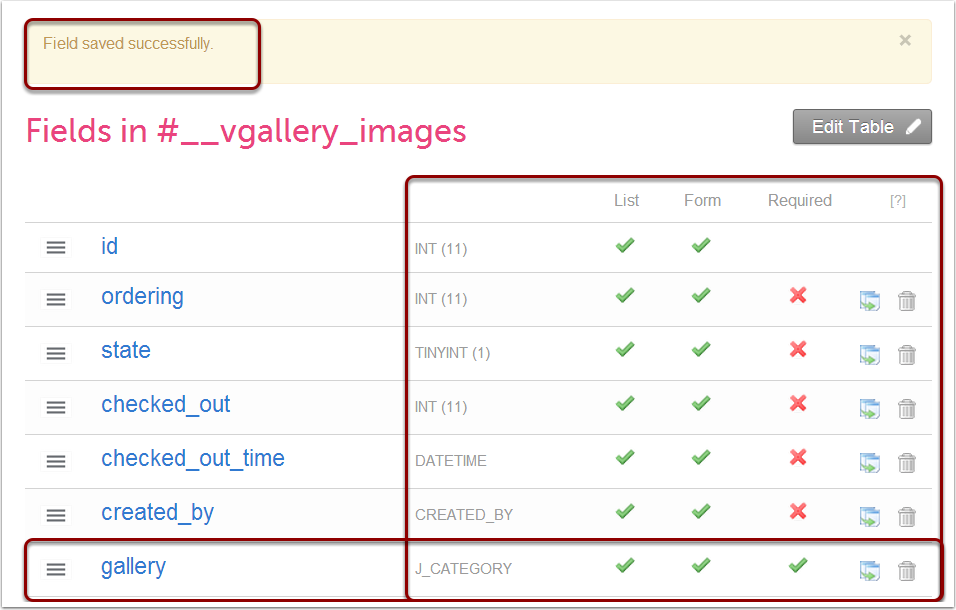
Notice that on the right of each fields we have several options both informative and actionable. Each row shows from left to right:
- A draggable icon to order the field
- The name of the field
- The field type.
- The views where it will be shown: form and list views. (The ticks/checks are interactive so you can change as necessary)
- If the field is required.
- A field cloning option.
- A button to delete the field.
You can see it is easy to add a new field. You just have to be sure about what you need. The hardest part so far has been to define the type of field you need to add to get what we want. For example, if you want to display a field you can add a title, it is pretty straight forward it will be a "Text Field". If you want the user to add an image we will add a "Media Manager" field. It is also easy to think that storing an integer data will need an "INT field". We just need to think about the purpose of a field before you define it.
Creating the Component: Generating the Extension
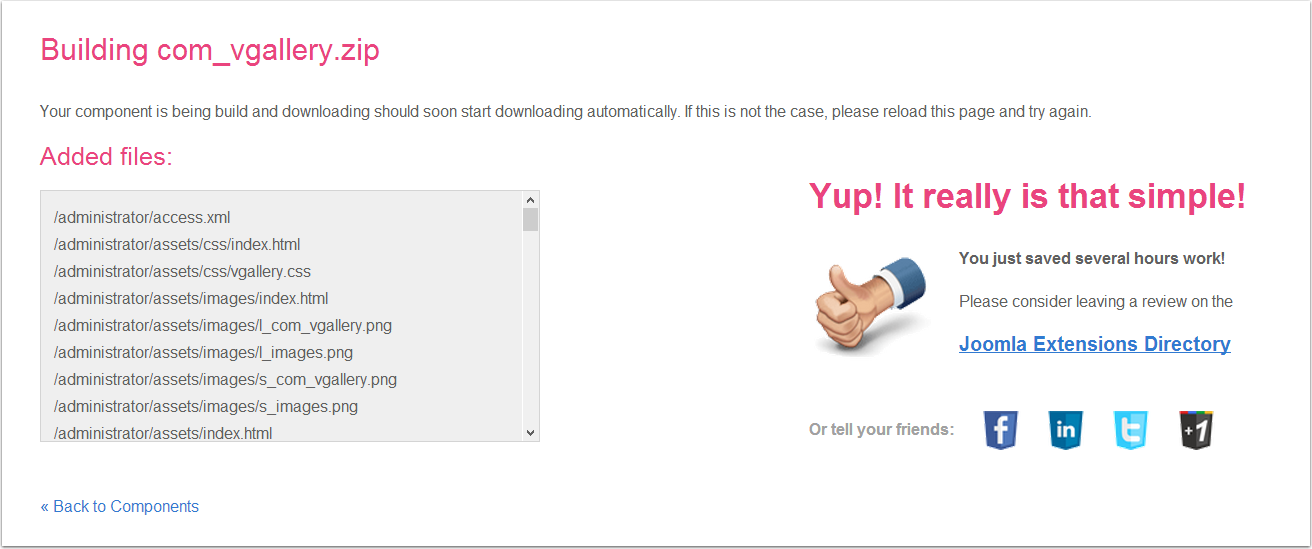
When our table has all of its fields properly set, it is time to build the component so that you can start using it on your site. You only have to find the “Build” button on the right sidebar or the Component list on your dashboard – it’s as simple as that.
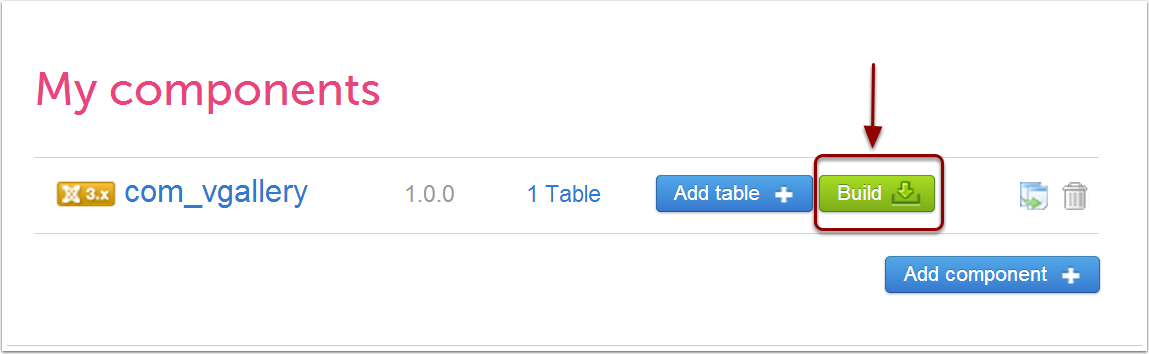
Once we click on “Build” you will get a screen like the following where the download will start automatically:
Conclusion
So far we have discovered how this tool creates components. I would like to add a few points that I think are important to take into consideration. The Wiki tool is in English only. However the whole Joomla Component Creator site is in several languages. It would be good if the Wiki was translated into these other languages too. There are also many things that can be extended in this documentation like the descriptions of the fields.
Usually the tool is easy to use, but there may be some difficulty in understanding how to define some of the ‘field types’. There are several fields that could be confusing for new users like the special field type "Foreign Key". Although the wiki explains its use using an example, I think it deserves a more in depth explanation. Especially here it would be additionally helpful to have the wiki translated into the other languages.
Otherwise the tool is very easy, flexible and very complete. Its main purpose is achieved and the code generated follows the Joomla framework standards.
Some articles published on the Joomla Community Magazine represent the personal opinion or experience of the Author on the specific topic and might not be aligned to the official position of the Joomla Project
About the author
By accepting you will be accessing a service provided by a third-party external to https://magazine.joomla.org/
Comments