
Revealing Joomla’s SEO Secrets - Redirect Manager (com_redirect)

One of the hidden gems which appeared with the 1.6 version of Joomla is the Redirect Manager - a simple system which allows you to identify and fix broken links. Before the Redirect Manager was introduced, the only way to find and fix broken URLs was to use a third party extension, an SEO scraper such as Screaming Frog, or looking in your server logs. Now it's possible to identify and manage broken links within the administrator panel of your Joomla website.
Although the redirect manager has been around since 1.6, many people don’t know it exists, let alone use it to improve the optimisation of their websites. Often, if you just want to be able to identify and fix broken links you don’t want to have to install extensions with lots of other features which could potentially slow down your site or cause other SEO-related problems - especially if you don’t need the extra features!
Accessing the Redirect Manager
To access the redirect manager, simply go to Components>Redirect from the drop-down menu of the administrator panel.
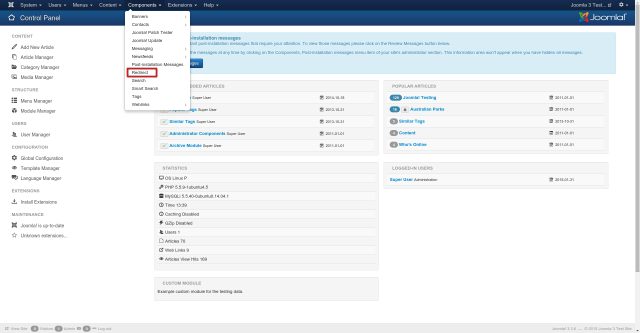
The Redirect Manager plugin is disabled by default on install, so you may see a message advising you that it needs to be activated before you can use the Redirect Manager.

To do this, simply go to Plugin Manager under Extensions > Plugin Manager, and using the search box on the left, find the Redirect Plugin, and click once on the red icon to enable the plugin.

Once the plugin is enabled, any URLs which result in a 404 error will be captured by the Redirect Manager, and be displayed in the main component.
To test this, simply visit a couple of URLs on your site which you know don’t exist - you should get a 404 error page - and then check in the Redirect Manager interface to see them listed.
Managing redirects
When you first start using the Redirect Manager, you will see all the links are unpublished - this means that they are links which are broken and have not yet been fixed in the Redirect Manager.

On the left side there is a filter which allows you to filter the list by state, which is useful when you’ve been using Redirect Manager for a while, and you need to find only the unpublished items (e.g. items needing your attention).
You can also search the URLs using the search box at the top of the list, for example if you are looking for a specific link which you need to fix.
On the far right, you can specify how many items should show in the list - this is useful if you need to view and/or change multiple URLs at a time without needing to go back and forth through pages of links.
Redirecting links
There are two ways to redirect links on your website, either individually or doing a batch-change.
Generally individual redirects would be the most common way to set up redirects, but if you have multiple links which need to go to the same place, you can use the batch redirect feature to change them all at once.
Individual redirects
To create a redirect one at a time, simply click the link you want to edit, or tick the box and press ‘edit’ on the top toolbar menu.
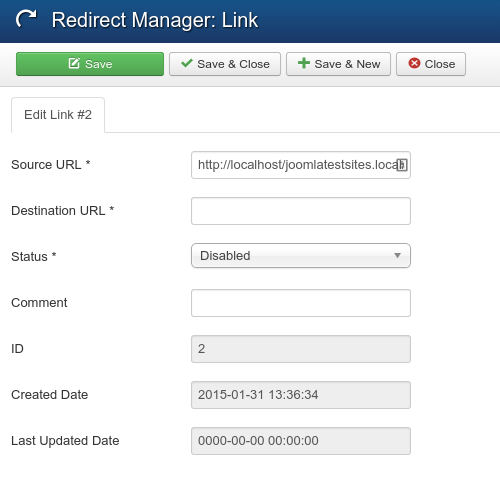
When editing an individual link, you will notice that the source URL is already populated, and there is a blank field beneath for you to enter the destination URL. This is the final location where you wish the old link to point.
Both the source and destination URL should be the full URL, as you would type it in your web browser.
Comments are useful to remember why you put a redirect in place - especially if it’s important and you don’t want somebody else to change it or delete it by accident - it’s often helpful to put your initials if more than one person works on the website.
The status field tells you whether the redirect is active (Published, or Enabled) or not (Unpublished, or Disabled). There are also other statuses including Archived and Trashed, however the first two are the ones which are most often used.
When the link is saved, you will see it appear in the list with a black tick in the first column, indicating that it is an active redirect.
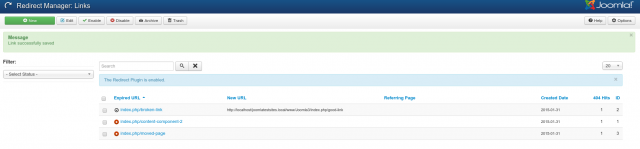
The destination URL appears in the ‘New URL’ column, which shows where the URL is being redirected.
If the 404 error occurred as a result of an inbound link, the ‘Referring page’ column may contain the location from which the link originated, so it is a good idea to have the referring page update their link to the correct URL.
Bulk redirects
Sometimes you will have the need to update several redirects at the same time - maybe there are several pages which are being combined into one, or incoming links which need to be redirected to a different location.
In the redirect manager component, there is a bulk edit feature which can be activated by selecting multiple items, and clicking on the ‘Destination URL’ linked text beneath the list of redirects.
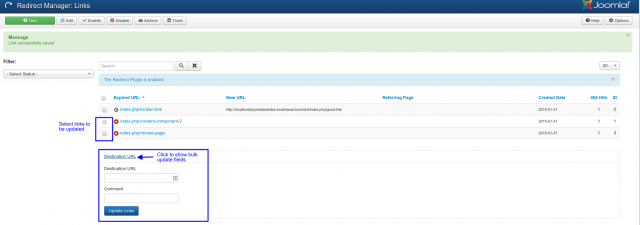
This allows you to apply the same URL and comment to multiple links - simply enter the full URL in the first field, and any comment you require in the second field.
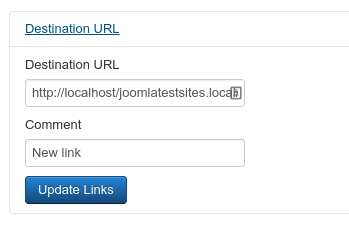
When you click on ‘Update links’ the links you selected will be updated to point at the Destination URL supplied, and enabled. They will appear in the list of links with the black tick mark, and the destination URL in the ‘New URL’ field.

What else can the Redirect Manager do?
That’s about it, at the moment - although there are some Pull Requests currently outstanding, some of which are available for testing in 3.4 beta - which will add some advanced features for SEO experts and improve the features already available:
- Increase number of characters in URL to allow more than 255 characters View PR
- Allow setting of custom http codes View PR
- Batch process of new URLs (allows you to copy/paste a list of URLs into com_redirect) View PR
Is there something you would like to see the Redirect Manager do? Why not submit an issue at http://issues.joomla.org with a clear explanation of what you would like to be able to do, and maybe your wish could be granted :)
Some articles published on the Joomla Community Magazine represent the personal opinion or experience of the Author on the specific topic and might not be aligned to the official position of the Joomla Project
About the author
By accepting you will be accessing a service provided by a third-party external to https://magazine.joomla.org/
Comments