
Customizing an Extension's Edit Screen
Clients grumble too often about a hard-to-use CMS. The problem, often, is delivering to clients edit screens that are unchanged from how they come out-of-the-box. We can do better. In this example we’ll be tailoring a complex edit screen into something streamlined for a particular client. The technique shown here can be applied to any extension and for any client with specific needs.
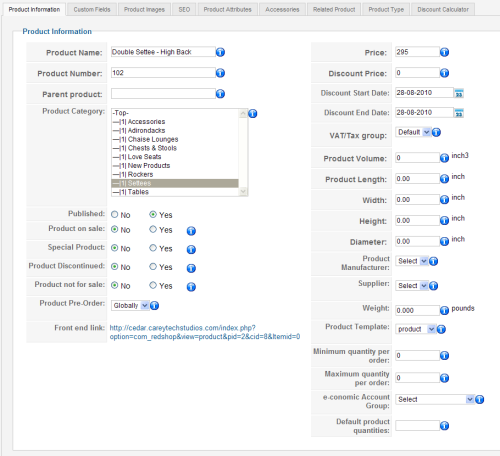
RedShop is a very feature-rich ecommerce component, and by necessity, its product edit screen is filled with several interrelated tabs holding dozens of fields that leverage everything the component can do. All these options are needed, and they are powerful in the hands of a developer. But clients expect an edit screen that is much simpler and more intuitive.
The client wants to see only the fields relevant for their project and the fields should be organized according to that client’s workflow. Let’s tailor the product detail screen to suit a theoretical client.
The initial screen that we get out-of-the-box:
The first step is to copy the view for the edit screen and place that copy into the folder which overrides the original. If you are unfamiliar with this practice, review this article.
Keep in mind that we are editing a view that is used within the backend, so the overriding file must be placed within the admin template.
For this example, here is the file to move:
/administrator/components/com_redshop/views/product_detail/tmpl/default.html
Assuming we are using the Bluestork admin template, place the copy here:
/administrator/templates/bluestork/html/com_redshop/product_detail/default.html
All edits on this view will occur upon this new file (under the admin template).
One might be tempted to rip out the fields and tabs that we do not need. Think before you do that. If later the client needs additional features (and this does happen), you will need to find and carefully replace the needed fields. Better, in my opinion, is to leave each field in place and mark each with a CSS class to instruct how that field is to be displayed.
Let’s create four CSS classes to set apart four ways to display a field: f_Required, f_Important, f_Optional, f_NotUsed.
I prefix the name of these CSS classes for two reasons: to reduce the chance I’m reusing a class name and to designate the context. Here the ‘f_’ designates a class applied to a field.
I’ll also create classes for the tabs: t_Important, t_Optional, t_NotUsed.
In this file, each field is contained within a table row, so for each field-holding <tr> I add the appropriate class for that field. Likewise, I apply the appropriate class to each tab.
<tr id="f_published" class="f_Required"> ... </tr>
<tr id="f_product-template" class="f_Important"> ... </tr>
<tr id="f_product-on-sale" class="f_Optional"> ... </tr>
<tr id="f_product-special" class="f_NotUsed"> ... </tr>
We isolate the CSS rules to their own CSS file. This makes them more reusable between projects.To include this new CSS file, we add two lines of code to the top of the view file we are overriding:
$document = JFactory::getDocument();
$document->addStyleSheet('templates/'.$template.'/css/redshop_product-detail.css');
After creating that file in the directory we specified, we create the style rules. Style as you prefer. But if you want to designate multiple levels of fields (require vs optional), make the field hierarchy visibly obvious and intuitive.
Here is a sample of the code I used.
table.admintable .f-Required td.key{background:#333; color:#fff;}
And of course, to “remove” a field from the edit form, use
{display:none;}
If security is an issue, you’ll want to code the php to not transmit sensitive fields instead of using this CSS trick.
Let’s see how the edit screen looks now:
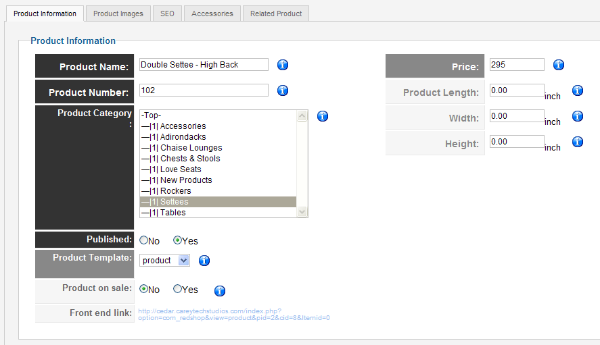
Try to see this screen from the eyes of a nontechnical client. Only the tabs and fields needed are displayed – and we’re showing a lot less of them from what we get out-of-the-box. One intuitively recognizes the differing importance among fields.
Don’t stop now. Even though the form includes “tip” icons, sometimes a little extra text next to a field’s label helps the infrequent user. A straightforward way is simply to append that text to the label. By surrounding this added “help” text with the <small> tag, we can create a CSS rule to format these appropriately:
table.admintable .f-Required td.key label small{font-family:arial, sans-serif; font-size:10px; font-weight:normal; line-height:1.15em; color:#999;}
Displayed help text can be more effective than detached paper documentation.
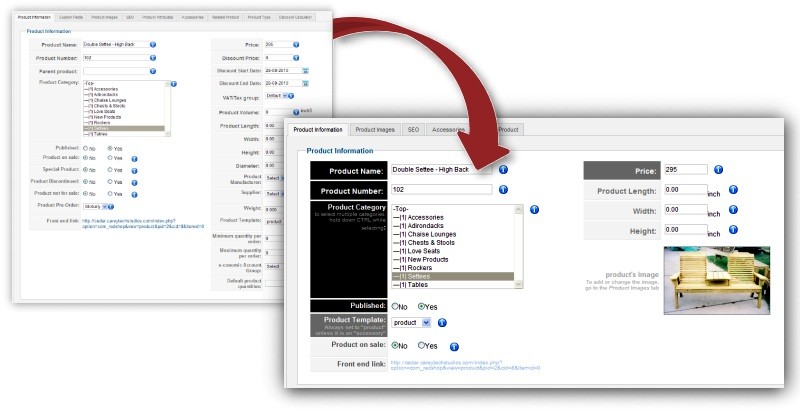
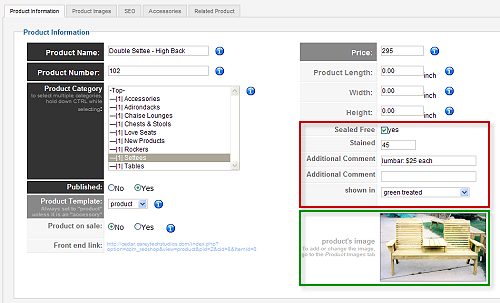
More importantly, we can cut-and-paste code to rearrange field order and move fields between tabs. We do so to accommodate the workflow. In the screen shot below, observe the two changes we made.
First (red), we moved the slate of custom fields to the front tab and eliminated the now-empty tab. Why make the products manager click back-and-forth between tabs?
Second (green), we copied the code that displays a thumbnail to include the image on the main tab. This way one can visually associate the product being edited and quickly recognize if a product image is missing.
See how this addition gives the client a better overview of the product from the initial screen.
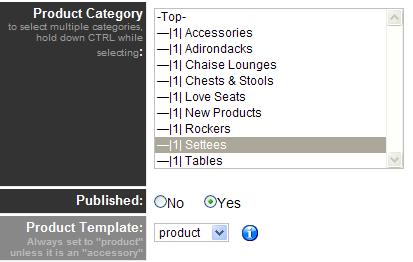
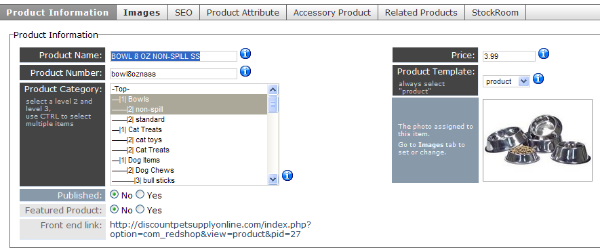
Each project and its business rules are different from the others. We can use the same approach for tailoring an edit screen, but more often than not, we’ll derive a different result for any given client. Here is the same product detail screen tailored for a different client.
If a client complains that we have delivered a hard-to-use system, much of their frustration probably comes from the comprehensive edit screens we deliver. Powerful extensions have to provide developers with comprehensive forms, but we don’t have to deliver them to the client this way. We can do better. We should.
Some articles published on the Joomla Community Magazine represent the personal opinion or experience of the Author on the specific topic and might not be aligned to the official position of the Joomla Project
About the author
By accepting you will be accessing a service provided by a third-party external to https://magazine.joomla.org/
Comments